
Managing Shopify data becomes difficult when your products, inventory, and pricing change throughout the day, but your reporting lives in spreadsheets. Many teams still rely on manual CSV exports, which quickly become outdated and interrupt workflows.
Learning how to export Shopify data into Google Sheets automatically helps teams maintain accurate records, collaborate in real-time, and reduce manual work. This guide shows you why automation matters, what data you can export, and how to set up automatic sync in under 5 minutes.
Table of Contents
Why Export Shopify Data to Google Sheets Automatically
Manual exports create bottlenecks. Your inventory changes, orders come in, and product details update throughout the day. By the time you download a CSV, open it, and share it with your team, the data is already outdated.
Automatic syncing solves this by connecting Shopify directly to Google Sheets. Your team sees live inventory levels, current prices, and real-time order data without downloading files or waiting for updates.
Here’s what automatic syncing delivers:
- Centralized reporting becomes simple when all your Shopify data flows into one spreadsheet. You can build dashboards, track performance, and share insights without juggling multiple CSV files.
- Team collaboration improves because everyone works from the same live data source. No more version conflicts, no more outdated spreadsheets, and no more asking for the latest export
- Managing your Shopify store without entering the admin panel, updating products, adjusting inventory, and modifying prices directly from Google Sheets, giving you the flexibility to work from anywhere using familiar spreadsheet tools.
- Real-time inventory visibility prevents stockouts and overselling. When inventory updates in Shopify, your Google Sheet reflects the change instantly, keeping your warehouse team and customer service aligned.
- Reducing manual exports eliminates human errors. Automated syncing removes the risk of uploading wrong files, missing data fields, or working from outdated information.
Common Ways to Export Shopify Data Into Google Sheets
There are several ways to export Shopify data to Google Sheets, but not all are suitable for ongoing workflows.
- Manual CSV export – Shopify allows manual exports, but these files quickly become outdated and require repeated downloads.
- Custom scripts – Some teams use Google Apps Script to build custom integrations, which require technical setup and ongoing maintenance.
- Automated sync tools – Automation tools create a direct connection between Shopify and Google Sheets, keeping data updated without manual effort. This is the most reliable option for teams that need real-time visibility.
What Shopify Data Can Be Exported to Google Sheets
When you export Shopify data into Google Sheets using inventory sync apps, you typically get access to product and inventory data, giving you control over catalog management.
- Product Information – View and edit product titles, descriptions, product types, vendors, and publication status in organized columns. All product details flow into your spreadsheet with complete visibility.
- Variants – Each of your products might have multiple variations based on size, color, and other options. Sync tools export variants as separate rows, showing their specific attributes and making it easy to manage products with multiple variations.
- Inventory Levels – Track stock quantities automatically across all locations. Monitor inventory changes, manage warehouse distribution, and identify low-stock items without logging into Shopify admin.
- Pricing Data – Update product prices, compare prices, and manage pricing strategies directly from Google Sheets. Pricing information appears in your sheet for quick reference and bulk editing.
- SKUs and Barcodes – Manage SKU assignments, track barcodes, and maintain organized inventory records across your entire catalog for accurate product identification.
- Product Images – Product images export as URLs in your spreadsheet. View image links, update product photos, and manage visual assets alongside other product data.
- Tags and Product Status – Use tags to categorize products, filter exports by collection, and manage product availability. Tags help you organize and filter your catalog efficiently.
Choosing the Right Tool for Shopify to Google Sheets Sync
Several apps on the Shopify App Store offer inventory sync with Google Sheets. FlexSync is one popular option that provides 2-way syncing, real-time updates, and formula-driven automation.
When selecting a sync app, consider these factors: supported data types, sync frequency, pricing tiers, ease of setup, and customer support quality. Most apps offer free trials, allowing you to test functionality before committing.
Step-by-step process to Automatically Export Shopify data into Google Sheets
Setting up FlexSync takes less than 5 minutes. The app creates a direct connection between your Shopify store and Google Sheets, enabling automatic data sync.
Step 1: Install FlexSync from the Shopify App Store
Visit the Shopify App Store and search for FlexSync: Stock Sync for Sheet. Click the Install button and authorize the app to access your store data. The installation completes in seconds.

Step 2: Connect Your Google Account
Open FlexSync from your Shopify admin panel. Click the “Let’s Get Started” button to begin the setup process, follow all the necessary step and then sign in with your Google account. FlexSync requests permission to create and edit Google Sheets on your behalf.

Or you can just watch this YouTube tutorial for quick understanding-
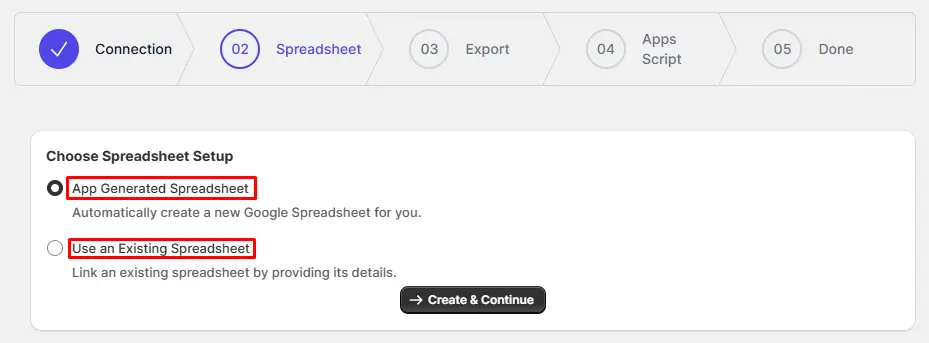
Step 3: Choose Spreadsheet Setup
FlexSync offers two options for spreadsheet setup. You can create a new Google Sheet manually and connect it to FlexSync, or let the app create a spreadsheet automatically on your behalf. Choose the option that fits your workflow and proceed to the next step.
For a detailed understanding of the setup, read this guide.
Step 4: Configure Your Columns
FlexSync lets you control which product fields appear in your Google Sheet. Select the columns you need from the available options, including inventory levels, prices, SKUs, product titles, descriptions, and more.
Required columns like Product ID, Variant ID, and Location ID are automatically included and cannot be removed. Optional columns can be added or hidden based on your workflow needs.
After selecting columns, use the drag-and-drop feature to reorder them. Arrange your most important data first, organize related fields together, and structure the spreadsheet to match how your team works. You can reorder columns either from the FlexSync dashboard or directly in Google Sheets. Column reordering does not affect sync functionality. You can also set up filters for your convenience. Filter configuration can be tricky with multiple operators and conditions. For detailed guidance on setting up filters correctly, check out the complete configuration guide.

Step 5: Adding App Script
Adding the app script is crucial for enabling real-time sync functionality. The app script allows FlexSync to detect changes you make in Google Sheets and push them to Shopify automatically.
Without configuring the app script, you’ll need to manually trigger sync from the FlexSync dashboard every time you make changes. The app script eliminates this manual step and enables true two-way automatic syncing.
Watch this step-by-step tutorial to understand how to set up your app script correctly.
Step 6: Test the Connection
Once you’ve added the app script properly, your setup is complete. You’ll see your products synced in the Google Sheet, confirming the connection is established.

To verify the two-way sync is working correctly, make a small test change in your Google Sheet. Update a product price or adjust an inventory quantity, then check your Shopify admin within a few minutes. The change should appear automatically in Shopify.
You can also test the reverse direction by updating a product in Shopify and checking if the change reflects in your Google Sheet. This confirms both directions of the sync are functioning properly.

Your setup is now complete. After configuration, you can manage your Shopify store directly from Google Sheets. Changes sync in real-time in both directions, giving you flexibility to work from either platform.
Common Use Cases for Shopify to Google Sheets Automation
Different teams use Shopify-to-Sheets automation for specific workflows. Understanding these use cases helps you maximize the value of automatic syncing.
Inventory and Stock Monitoring
Warehouse teams track stock levels across multiple locations without logging into Shopify. They view real-time inventory counts, identify low-stock items, and plan reorders using Google Sheets filtering and sorting tools.
FlexSync highlights inventory changes, making it easy to spot which products sold recently and which locations need restocking. Teams can set up conditional formatting to flag items below minimum thresholds.
Product Catalog Management
Marketing teams manage product descriptions, titles, and images from Google Sheets. They can update hundreds of products simultaneously using bulk edit tools, test new product copy, and roll out changes across the entire catalog.
The spreadsheet format makes it simple to review product information side by side, identify inconsistencies, and maintain brand voice across all product listings.
Price Updates and Promotions
Pricing teams adjust product prices and compare prices using formulas. They can calculate discounts, apply percentage markups, and test pricing strategies before syncing changes to Shopify.
FlexSync supports formula-driven automation, allowing teams to create dynamic pricing rules that update automatically based on cost changes or competitive data.
Multi-Location Inventory Management
Teams managing inventory across multiple warehouses or retail locations use Google Sheets to view and update stock levels from a single dashboard. They can transfer inventory between locations, balance stock distribution, and prevent location-specific stockouts.
Team Collaboration on Product Launches
Cross-functional teams collaborate on product launches using shared Google Sheets. Sales, marketing, and operations teams work from the same live data source, coordinating product details, pricing, and inventory allocation.
Comments and revision history in Google Sheets create an audit trail, showing who made changes and when. This transparency improves accountability and makes it easy to track decision history
Store Migration and Catalog Cleanup
During store migrations or major catalog updates, teams often need a clear overview of product data before making changes live. Managing this directly inside Shopify can be time-consuming, especially when reviewing large catalogs.
Using Google Sheets provides a structured way to review products, standardize data, and make bulk updates before syncing changes back to Shopify. This makes catalog cleanup and restructuring easier to manage and review without disrupting live operations.
Customer Support and Order Resolution
Customer support teams frequently need quick access to product and inventory information when handling customer questions. Switching between tools or waiting on other teams slows down responses.
With Shopify data available in Google Sheets, support teams can reference key product details and availability quickly, helping them respond faster and more confidently without navigating the Shopify admin.
Final Thoughts
Automation saves time only when it’s reliable. FlexSync creates a dependable connection between Shopify and Google Sheets, ensuring your data stays current without manual intervention.
Real-time syncing removes spreadsheet chaos by eliminating version conflicts and outdated exports. Your team always works from the latest data, improving decision quality and operational efficiency.
FlexSync bridges Shopify and Google Sheets the way teams actually work, combining the power of Shopify’s commerce platform with the flexibility of spreadsheet-based collaboration. Learn more about shopify inventory management.
FAQ’s
How to connect Shopify to Google Sheets?
Install FlexSync from the Shopify App Store, connect your Google account, and configure your export settings. The app creates a direct connection that syncs product and inventory data automatically without manual CSV exports.
How do I automatically pull data from a website into Google Sheets?
Use integration apps like FlexSync that establish API connections between platforms. These apps handle authentication, data mapping, and scheduled syncing, eliminating the need for manual imports or scripting.
Can I export Shopify orders to Google Sheets using FlexSync?
FlexSync focuses on product and inventory data, not order information. For order exports, you’ll need to use Shopify’s native CSV export feature or dedicated order management apps from the Shopify App Store.
What product data can I sync with FlexSync?
FlexSync syncs product titles, descriptions, variants, prices, SKUs, barcodes, inventory levels, product images, tags, and product status. All data syncs bidirectionally, so changes in Google Sheets update Shopify automatically.

