Knowing how your Shopify store handles out-of-stock products is more important than most merchants realize. The Shopify inventory policy is the setting that decides exactly what happens when a product hits zero: does Shopify block the purchase, or keep selling?
This guide walks you through what the inventory policy setting actually does, how to configure it correctly, and how to manage it at scale without logging into your Shopify admin every time something changes.
Table of Contents
What Is the Shopify Inventory Policy?
Shopify’s inventory policy is a per-variant setting that controls purchasing behavior when stock runs out. It has two values:
- Deny: Customers cannot add the item to their cart once inventory reaches zero. This is the default.
- Continue: This enables Shopify to keep selling when out of stock function. Customers can still purchase the item even if it shows zero stock. Useful for pre-orders, made-to-order products, or fast-restocking SKUs.
This setting only matters if inventory tracking is enabled for the product. If tracking is turned off, Shopify ignores the policy entirely and treats the item as always in stock.
Quick stat: According to research, 34% of retail businesses have shipped orders late because they accidentally sold products they did not actually have. Getting your inventory policy right from the start prevents exactly this problem. (Source: Peoplevox E-Commerce Fulfilment Report)
Shopify Overselling: Why Your Inventory Policy Setting Matters
Most merchants set the inventory policy once during product setup and forget about it. That is a mistake. Here is why this setting has a direct impact on your store’s performance:
- If you allow purchases on out-of-stock items without a clear restock plan, you risk order cancellations and negative reviews. Overselling damages trust.
- Setting everything to Deny during a brief restock window means lost orders from customers ready to buy. Blocking sales costs revenue.
- If you sell across platforms, a sync delay can lead to a customer ordering something on your Shopify store that is already sold out on another channel. Multi-channel selling makes it worse.
- If you have 500+ SKUs, individually editing inventory policy in the Shopify admin becomes a time drain. Managing hundreds of variants manually is not realistic.
Global inventory distortion covering overstock, shrinkage, and stockouts costs businesses $1.1 trillion annually. A clear, consistent inventory policy is one of the simplest things you can do to protect your store from that problem.
How to Set Up Inventory Tracking in Shopify
Before your inventory policy can take effect, tracking must be enabled. Here is how to do it:
- Go to Products in your Shopify admin and select a product.
- Scroll to the Inventory section. Check the box labeled “Track quantity.”
- Set your stock quantity for each location if you use multiple warehouses.
- Configure the inventory policy. Choose either “Continue selling when out of stock” (Continue) or leave it unchecked (Deny).
- Save the product. Repeat for each variant or product.
For bulk updates via CSV, use the Variant Inventory Policy column. Enter deny to block purchases at zero stock, or leave it blank to allow continued selling. You can also use the Shopify Inventory CSV guide for the full import process.
Shopify Keep Selling When Out of Stock: Deny vs. Continue
This is not a one-size-fits-all decision. The right setting depends on how your business actually operates.
| Scenario | Recommended Policy | Why |
|---|---|---|
| Seasonal / limited products | Deny | No future restock expected; avoid over-promising |
| Fast-restocking SKUs | Continue | Restock arrives within days; no need to lose the sale |
| Pre-order campaigns | Continue | Intentional demand capture before stock arrives |
| Made-to-order items | Continue | Product is always producible; stock tracking is irrelevant |
| Slow / unreliable supplier | Deny | Do not risk delivering late and losing customer trust |
One important note: the Continue setting should only be used when you are confident the product will be restocked on time. Using it carelessly is one of the leading causes of Shopify overselling issues.
The Problem With Managing Inventory Policy at Scale
If your store has dozens or hundreds of products, the Shopify admin approach breaks down fast. Each product has its own inventory section. Each variant has its own policy setting. Editing them one by one is slow, error-prone, and unsustainable.
Here is what typically goes wrong:
- A team member sets a product to Continue during a promotion and forgets to switch it back.
- A new product gets added without the correct policy, and it starts accepting orders with zero stock.
- You want to audit which products are set to Continue, but there is no simple way to see that in the Shopify admin.
- You need to update the inventory policy for 200 variants at once, which requires a CSV export, manual edits, and a re-import.
This is where managing inventory policy directly from a spreadsheet becomes a practical advantage.
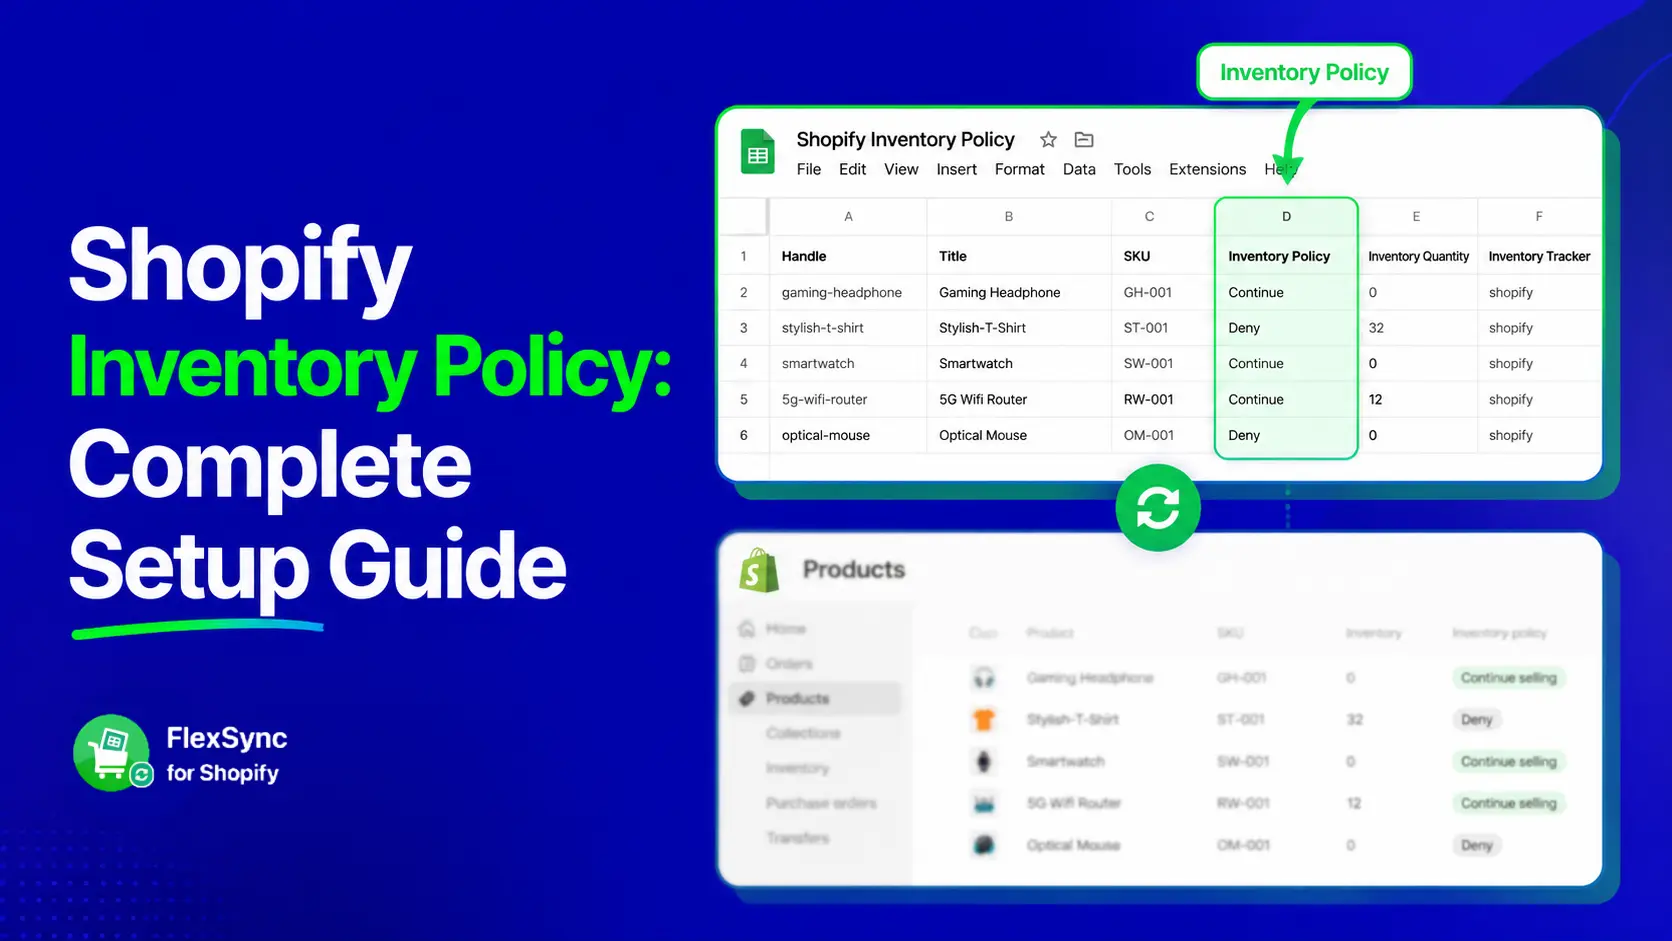
How FlexSync Lets You Manage Shopify Inventory Policy from Google Sheets
FlexSync is a Shopify app that syncs your store data with Google Sheets bidirectionally. Changes you make in the sheet push back to Shopify automatically.
FlexSync has native support for Inventory Policy with full bidirectional sync from Google Sheets. This means you can view, audit, and update the inventory policy for every product variant in your store directly from a Google Sheet.
What This Looks Like in Practice
Here is a practical workflow for a store with 300+ SKUs:
- Export your product catalog to Google Sheets using FlexSync. Read the full setup guide.
- Enable Inventory Policy in the app’s column settings to automatically sync all policy data with your connected sheets.
- Bulk edit the Inventory Policy column, switch 50 seasonal products from Continue to Deny in seconds.
- Sync back to Shopify. FlexSync pushes the changes through Shopify’s API with cost-based throttling, so even large catalogs sync reliably without hitting rate limits.
If you are managing inventory across multiple Shopify locations, working with a large product catalog, or want to automate a Shopify store, this kind of spreadsheet-level control is much faster than working inside the Shopify admin. You can install FlexSync from the Shopify App Store and start with a free trial.
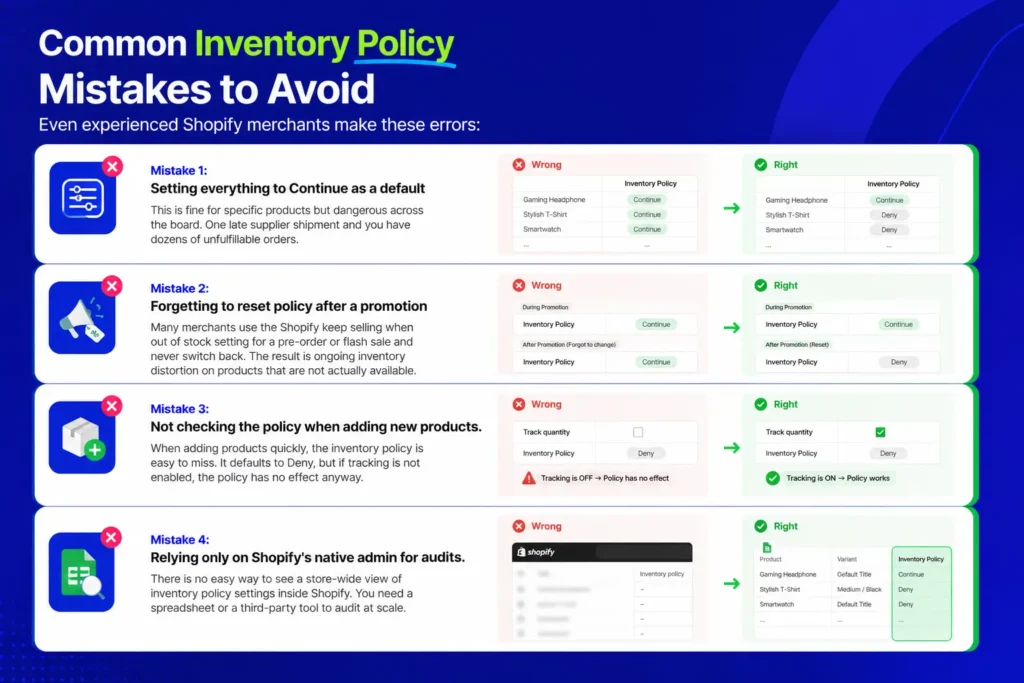
Common Inventory Policy Mistakes to Avoid
Even experienced Shopify merchants make these errors:
- Mistake 1: Setting everything to Continue as a default
This is fine for specific products but dangerous across the board. One late supplier shipment and you have dozens of unfulfillable orders. - Mistake 2: Forgetting to reset policy after a promotion
Many merchants use the Shopify keep selling when out of stock setting for a pre-order or flash sale and never switch back. The result is ongoing inventory distortion on products that are not actually available. - Mistake 3: Not checking the policy when adding new products.
When adding products quickly, the inventory policy is easy to miss. It defaults to Deny, but if tracking is not enabled, the policy has no effect anyway. - Mistake 4: Relying only on Shopify’s native admin for audits.
There is no easy way to see a store-wide view of inventory policy settings inside Shopify. You need a spreadsheet or a third-party tool to audit at scale.
Inventory Policy and Multi-Channel Selling
If you sell on multiple channels your Shopify store, a marketplace, social commerce inventory policy becomes even more critical.
Research shows that 80% of consumers use multiple channels to complete a purchase. This means your stock is being sold from multiple directions at once. A sync delay between your Shopify store and a marketplace can lead to overselling even when your policy is set to Deny.
The safest approach for multi-channel merchants:
- Keep safety stock do not run inventory down to zero before reordering.
- Use real-time sync tools to update inventory across all channels instantly.
- Set inventory policy to Deny for any product where a restock timeline is uncertain.
- Use Continue only for products with confirmed incoming stock or made-to-order items.
FlexSync supports multi-location filtering in exports, so you can manage inventory policy by location; this is helpful if some warehouses restock faster than others.
Quick Checklist: Shopify Inventory Policy Setup
- Inventory tracking is enabled for all products you want to manage.
- Each product variant has the correct policy: Deny or Continue based on your restock reliability.
- Pre-order or seasonal products use Continue only when restocking is confirmed and communicated to customers.
- You have a process to audit inventory policy after major promotions or new product launches.
- If you have 50+ SKUs, you are using a tool (like FlexSync) to manage inventory policy at scale instead of editing each product manually.
Frequently Asked Questions
What is the Shopify inventory policy setting?
It is a per-variant setting in Shopify that controls what happens when a product runs out of stock. Set to Deny, customers cannot purchase the item. Set to Continue, they can still place an order even at zero inventory.
How do I allow customers to keep buying when a product is out of stock in Shopify?
Go to the product in your Shopify admin, scroll to the Inventory section, and check “Continue selling when out of stock.” This triggers the Shopify keep selling when out of stock behavior for that product or variant. Make sure inventory tracking is enabled or the setting has no effect.
Does Shopify automatically stop selling when inventory hits zero?
Only if tracking is enabled and the policy is set to Deny. If tracking is off or the policy is set to Continue, Shopify will not block purchases regardless of your stock level.
Can I set different inventory policies for different product variants?
Yes. Each variant in Shopify has its own inventory policy setting. You can set size S to Continue (if you are getting a restock) and size L to Deny (if that size is discontinued), all within the same product.
How do I bulk update inventory policy in Shopify?
There are two options. First, you can use Shopify’s CSV import export your inventory, edit the Variant Inventory Policy column (deny or blank for continue), and re-import. Second, you can use FlexSync to export your product catalog to Google Sheets, bulk edit the Inventory Policy column, and sync changes back to Shopify in one step; no CSV handling required.
Is it bad to set Shopify inventory policy to Continue?
Not by itself. It depends entirely on your supply chain. Continue is a smart choice for pre-orders, made-to-order products, and fast-restocking SKUs. It becomes a problem when used carelessly taking orders on products with no confirmed restock date leads to cancellations and unhappy customers.
What is the difference between deny and continue in Shopify inventory policy?
Deny prevents checkout once inventory reaches zero. Continue allows customers to purchase even when stock shows as zero or negative. The right choice depends on whether you can reliably fulfill the order after the sale.
Final Thoughts
Your Shopify inventory policy is a small setting with a big impact. Set it correctly and you protect both your revenue and your customer relationships. Ignore it and you risk Shopify overselling, order cancellations, and trust damage that is hard to recover.
For stores with a large number of SKUs or complex inventory situations, multiple locations, seasonal products, or multi-channel selling – managing this setting manually in the Shopify admin is not sustainable.
FlexSync gives you a spreadsheet-level view of your entire catalog, including inventory policy, so you can audit and update it in bulk without touching the Shopify admin for every product. Try FlexSync free from the Shopify App Store and take control of your inventory policy at scale. Learn more about Shopify inventory management

