Shopify powers over 1 million businesses in 175 countries (Shopify, 2024). Every one of those businesses deals with the same challenge: getting orders from placed to fulfilled without mistakes, delays, or unhappy customers.
When your store is small, managing orders manually in the Shopify dashboard is easy. As you grow, orders pile up, fulfillment gets complex, and tracking everything becomes a full-time job.
This guide covers every method for Shopify order management in 2026. Whether you are processing your first 10 orders or your first 10,000, you will find the right approach here.
Table of Contents
Understanding Shopify Order Statuses
Every Shopify order has three separate status types. Understanding them is the foundation of good order management.
- Payment status: whether the customer has paid and whether the payment was captured.
- Fulfillment status: whether the items have been packed and shipped.
- Return status: whether a return or refund has been requested or processed.
Each status updates independently. An order can be paid but unfulfilled. It can be fulfilled but then returned. Here is a full breakdown.
| Status Type | Value | What It Means |
| Payment Status | Paid | Payment was captured successfully |
| Payment Status | Pending | Awaiting payment confirmation (e.g., bank transfer) |
| Payment Status | Voided | Payment was cancelled before capture |
| Payment Status | Refunded | Full or partial refund issued to the customer |
| Fulfillment Status | Unfulfilled | Order has not been packed or shipped yet |
| Fulfillment Status | In Progress | Fulfillment has been started but not completed |
| Fulfillment Status | Fulfilled | All items have been shipped |
| Fulfillment Status | Partially Fulfilled | Some items shipped, others still pending |
| Return Status | Return Requested | Customer has submitted a return request |
| Return Status | Returned | Items received back and return processed |
Understanding these statuses helps you filter, prioritize, and act on orders correctly. For related reading, see our guide on Shopify inventory management, which covers how stock levels connect to order fulfillment.
The Shopify Order Management Workflow
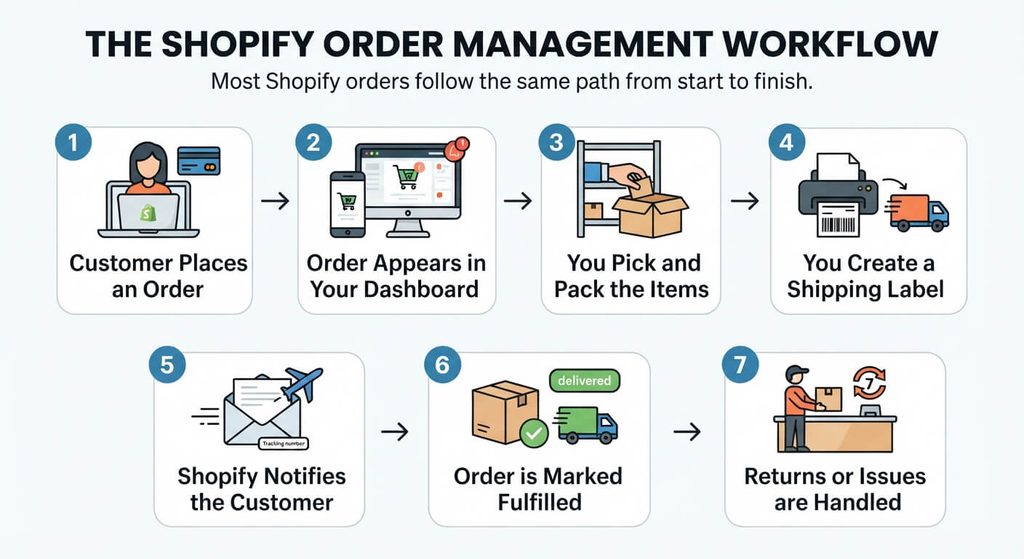
Most Shopify orders follow the same path from start to finish. Knowing this flow helps you spot where things go wrong.
- Customer places an order: Shopify captures the payment, reduces inventory, and sends the customer a confirmation email.
- Order appears in your dashboard: You receive a notification. The order shows as Paid and Unfulfilled in your admin.
- You pick and pack the items: Staff pull the products from stock and prepare them for shipping.
- You create a shipping label: Shopify Shipping or a third-party carrier generates the label. Tracking details are attached to the order.
- Shopify notifies the customer: A shipping confirmation email goes out with the tracking number automatically.
- Order is marked Fulfilled: Once shipped, the fulfillment status updates. Shopify can archive the order automatically after fulfillment.
- Returns or issues are handled: If the customer requests a return, you initiate the return process, restock the item, and issue a refund if needed.
Every step above can be streamlined or automated. The sections below show you how.
How to Manage Orders in the Shopify Admin Dashboard
The Shopify admin is where most store owners spend their time. Here is what you can do from the Orders section.
Viewing and Filtering Orders
Go to Orders in your Shopify admin. By default, you see all open orders. Use the filter bar to narrow results by:
- Payment status (Paid, Pending, Refunded)
- Fulfillment status (Unfulfilled, Partially Fulfilled, Fulfilled)
- Date range
- Sales channel (online store, POS, social)
- Tagged orders
Save your filter combinations as custom views so you do not have to re-apply them each time.
Using Bulk Actions
Select multiple orders using the checkbox column, then use the Actions dropdown to:
- Print packing slips or shipping labels for multiple orders at once
- Mark orders as fulfilled in bulk
- Archive orders that are complete
- Add tags to a batch of orders
Bulk actions save significant time when you are processing 20 or more orders at once.
Order Tags
Tags are one of the most underused order management tools in Shopify. You can add tags manually or through automation. Common uses:
- Tag orders by sales channel or region for reporting
- Tag high-value orders for priority handling
- Tag orders with specific product issues for follow-up
- Tag orders by warehouse or fulfillment location
Tags are searchable and filterable, which makes them useful for building custom workflows.
The Order Timeline
Every order in Shopify has a timeline at the bottom that records every action taken: payment captured, fulfillment created, email sent, refund issued. This is your audit trail. If there is a dispute or a fulfillment error, the timeline shows exactly what happened and when.
How to Fulfill a Shopify Order
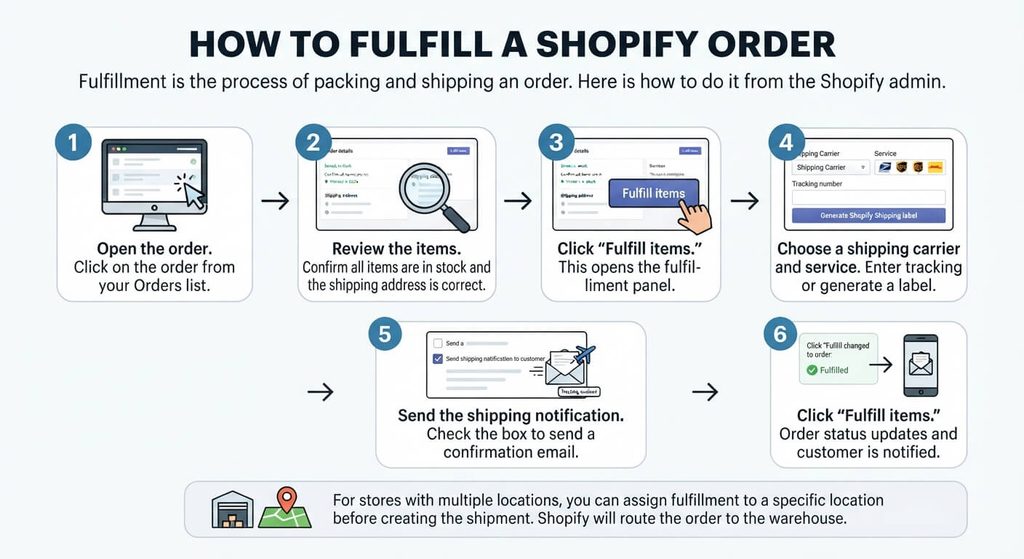
Fulfillment is the process of packing and shipping an order. Here is how to do it from the Shopify admin.
- Open the order. Click on the order from your Orders list.
- Review the items. Confirm all items are in stock and the shipping address is correct.
- Click “Fulfill items.” This opens the fulfillment panel.
- Choose a shipping carrier and service. Enter the tracking number manually or generate a Shopify Shipping label. Shopify Shipping offers discounted rates from carriers like USPS, UPS, and DHL.
- Send the shipping notification. Check the box to send the customer a shipping confirmation email with the tracking link.
- Click “Fulfill items.” The order status updates to Fulfilled. The customer is notified.
For stores with multiple locations, you can assign fulfillment to a specific location before creating the shipment. Shopify will route the order to the warehouse that has the items in stock.
How to Handle Returns, Refunds, and Exchanges on Shopify
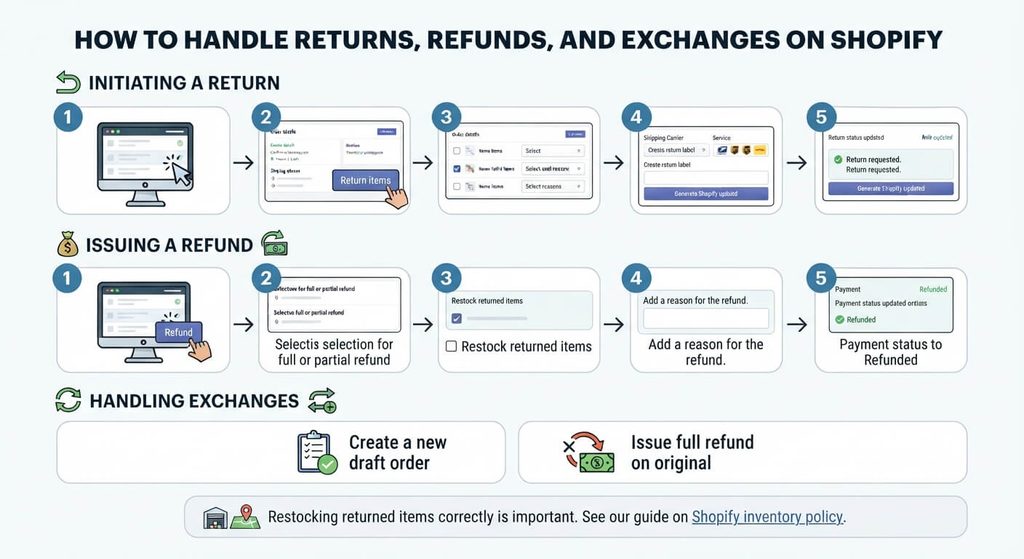
Initiating a Return
- Open the fulfilled order in your Shopify admin.
- Click “Return items.”
- Select which items the customer is returning and the reason.
- Choose whether to create a return label. Shopify can generate one automatically.
- Click “Create return.” The return status updates to “Return requested.”
Issuing a Refund
- Open the order and click “Refund.”
- Select the items to refund. You can refund a full order or individual items.
- Choose whether to restock the returned items. Enable this to add the quantity back to inventory.
- Add a reason for the refund (optional, for your records).
- Click “Refund.” The payment status updates to “Refunded” or “Partially Refunded.”
Restocking returned items correctly is important for keeping your inventory count accurate. See our guide on Shopify inventory policy to understand how Shopify handles stock adjustments on returns.
Handling Exchanges
Shopify does not have a native exchange button. The most common approach is to create a new draft order for the replacement item and issue a full refund on the original. Some store owners use tags to link the two orders for tracking.
How to Automate Shopify Order Management
Manual order management does not scale. Here are the automation tools built into Shopify.
Shopify Flow
Shopify Flow is a built-in automation builder available on all Shopify plans. It uses triggers, conditions, and actions to automate common tasks. Useful order management flows include:
- Auto-tag orders based on order value, product type, or customer location
- Send internal Slack or email alerts for high-value orders
- Pause fulfillment on flagged orders for review
- Archive fulfilled orders automatically after 7 days
- Apply discount codes to repeat customers on their next order
Shopify Flow has dozens of pre-built templates. You can get started without writing any code.
Order Notification Customization
Shopify sends automatic email notifications at each stage of the order lifecycle. You can customize these in Settings → Notifications. Common customizations:
- Add your store logo and brand colors
- Include product care instructions or FAQs in the shipping confirmation
- Add cross-sell recommendations to the order confirmation
- Customize return instructions in the refund notification
Auto-Archive
Shopify can automatically archive orders once they are fully paid and fulfilled. Enable this in Settings → Checkout → Order processing. Auto-archiving keeps your Orders list clean and makes it easier to focus on open orders that need attention.
How to Manage Shopify Orders in Google Sheets with FlexSync
Most Shopify tools for order management are either the built-in dashboard or expensive enterprise platforms. FlexSync offers a third option: manage and edit your Shopify orders directly in Google Sheets, then push changes back to Shopify with one click.
This is useful for store owners who already work in spreadsheets, want to do bulk edits across many orders, or need to share order data with team members who do not have Shopify admin access.
FlexSync’s Order Sync feature exports your Shopify orders and draft orders to a dedicated Google Sheets tab. You can configure which columns to display, apply filters (for example, show only unfulfilled orders), and sort by oldest first. When you make changes to supported fields, you push those changes back to Shopify in one click. See the full FlexSync order sync documentation for the complete field list.
What You Can Edit in Google Sheets
FlexSync marks editable fields in yellow inside the spreadsheet. Supported edits include:
- Fulfillment status (updated via dropdown selection, no manual typing)
- Order notes and internal tags
- Draft order fields (for pre-orders and custom orders)
Not all fields are editable. Read-only fields show the order data for reference but cannot be pushed back to Shopify. This prevents accidental changes to payment or customer data.
How to Set Up FlexSync Order Sync
- Install FlexSync. Get it from the Shopify App Store. A free plan is available.
- Open FlexSync and go to Advanced Settings. Find the Order Sync toggle and enable it.
- Choose your data type. Select “Orders,” “Draft Orders,” or both.
- Configure your columns. Choose which order fields to include in the export. Add or remove columns based on what your team needs to see.
- Apply filters. Filter by fulfillment status, date range, or other criteria to export only the orders you need.
- Click “Export and Continue.” Your orders appear in a new tab in your connected Google Sheet.
- Edit in Google Sheets. Make changes to the yellow-highlighted fields. Update fulfillment statuses using the dropdown menus.
- Push changes to Shopify. Return to FlexSync and click “Push order changes to Shopify.” Changes sync instantly.
FlexSync also handles Shopify inventory sync alongside order sync, so your stock levels and order data stay consistent in the same spreadsheet. For a full guide on setting up the connection, see how to connect Google Sheets to Shopify.
You can also export all your Shopify data to Google Sheets, including products, customers, and inventory, alongside your orders.
Why use FlexSync for order management?
No Shopify admin access needed for your team. Share the Google Sheet instead.Bulk edit fulfillment statuses across hundreds of orders at once.Filter and sort orders in ways the Shopify admin cannot.Free plan available. No enterprise OMS contract required.
Common Shopify Order Management Problems and Fixes
Order stuck in Payment Pending
This happens when a customer uses a payment method that requires manual confirmation, such as a bank transfer or check. You can capture the payment manually from the order page once the funds clear. If the payment never comes through, you can void the order.
Inventory not updating after a sale
Check your product’s inventory tracking settings. If inventory tracking is set to “Do not track,” Shopify will not reduce stock on orders. Also check if the item has a variant with a separate inventory count that was not adjusted. For multi-location stores, confirm the order was assigned to the correct location.
Order notification emails not sending
Go to Settings → Notifications and confirm the relevant notification is enabled. Check that your store email address is verified. If customers are not receiving emails, ask them to check their spam folder. Custom notification templates can sometimes break if edited incorrectly, so revert to the Shopify default and re-apply your changes carefully.
Duplicate orders appearing
Duplicate orders usually happen when a customer clicks the checkout button multiple times before the payment processes. Shopify typically catches this, but if it slips through, void or cancel the duplicate immediately. Issue a refund to the customer and send a manual confirmation for the order you are fulfilling.
Cannot restock items after a refund
When issuing a refund, make sure to check the “Restock items” checkbox before confirming. If you forgot, you can manually adjust the inventory count in Products → Inventory. This does not retroactively update the refunded order’s timeline, but it will correct the stock number.
When to Move Beyond Shopify’s Built-In Order Management
Shopify’s native tools are enough for most small to mid-size stores. But there are clear signs it is time to add a dedicated order management app.
- You sell on multiple channels (Amazon, eBay, your Shopify store, retail) and orders come from all of them.
- You have more than one warehouse or fulfillment location and need smart routing.
- Your team is spending hours on manual data entry that could be automated.
- You need detailed order analytics that Shopify’s built-in reports do not provide.
- You need to handle complex return workflows at scale.
When you reach that point, a dedicated tool can help. See our guide to the best order management apps for Shopify for a full comparison. For a broader look at tools that improve your store, see the best Shopify apps.
Frequently Asked Questions
How do I view all my Shopify orders?
Go to your Shopify admin and click “Orders” in the left menu. You will see all orders by default. Use the filter bar at the top to sort by date, payment status, fulfillment status, or sales channel. You can also search for a specific order by order number, customer name, or email.
Can I edit an order after it has been placed?
Yes, with some limits. You can edit a Shopify order before it is fulfilled. You can add or remove items, change quantities, and update the shipping address. Once an order is fulfilled, you cannot edit it, but you can create a return or a new draft order for any changes.
How do I cancel a Shopify order?
Open the order in your admin and click “More actions,” then “Cancel order.” Choose whether to restock the items and whether to refund the payment. You can cancel an order at any point before it is fulfilled. After fulfillment, you need to initiate a return instead.
What is the difference between archiving and cancelling an order?
Cancelling an order stops the fulfillment process and can trigger a refund. The order remains visible in your admin and shows a Cancelled status. Archiving simply moves a completed order out of your active list for cleanliness. The order is still fulfilled and paid. You can unarchive it at any time.
How do I manage draft orders in Shopify?
Draft orders let you create orders manually on behalf of a customer, for example over the phone or at a trade show. Go to Orders → Drafts and click “Create draft order.” Add the customer, products, and any custom pricing or discounts. Send the invoice link to the customer to pay, or mark it as paid manually. Once paid, it converts to a regular order.
Can I manage Shopify orders without accessing the admin?
Yes. FlexSync lets you manage orders in Google Sheets. You can view, filter, and update fulfillment statuses in a spreadsheet and push changes to Shopify without logging into the admin. This is useful for teams where not everyone has Shopify admin credentials. See the FlexSync order sync documentation for setup details.
Conclusion
Shopify order management covers more than just clicking “Fulfill.” It includes understanding order statuses, processing payments, handling returns, running automation, and choosing the right tools as your store scales.
For most stores, the Shopify admin handles day-to-day needs well. Add Shopify Flow for automation and FlexSync for spreadsheet-based order editing and bulk updates. When you are ready for a dedicated order management platform, see the best order management apps for Shopify for a full comparison.
Ready to manage your orders in Google Sheets? Try FlexSync free or visit FlexSync.app to learn more.
