FlexSync lets you manage Shopify Orders and Draft Orders directly from Google Sheets. You can choose the data you want to export, organize it with filters, edit supported fields, and push those changes back to your Shopify store.
This guide explains how to configure Order Sync and Draft Orders, work with the exported Google Sheets tabs, and sync supported changes back to Shopify.
1. Enable Order Sync #
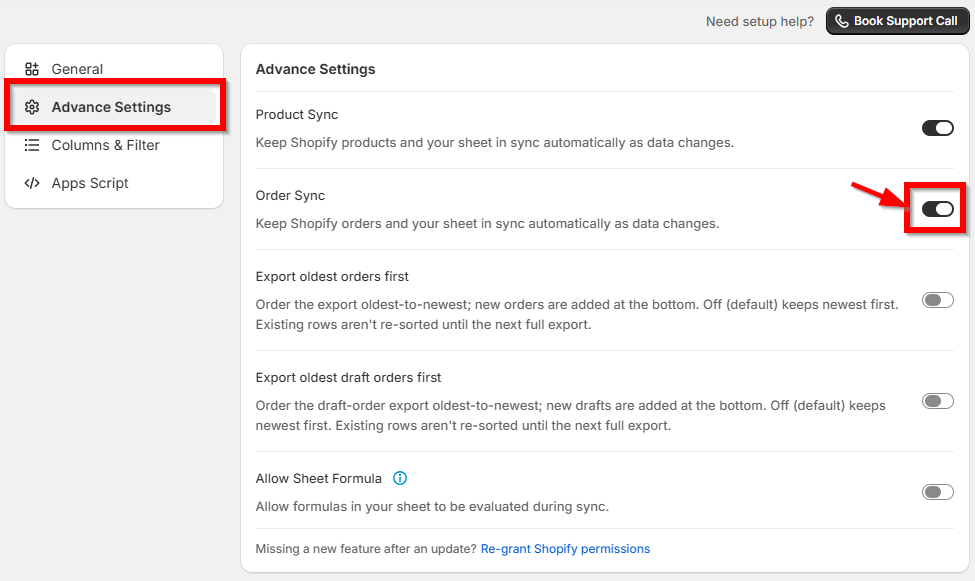
To start working with Shopify Orders in Google Sheets, first enable Order Sync from FlexSync.
Go to:
FlexSync → Advance Settings → Order Sync
2. Configure Orders & Draft Orders #
Once Order Sync is enabled, go to:
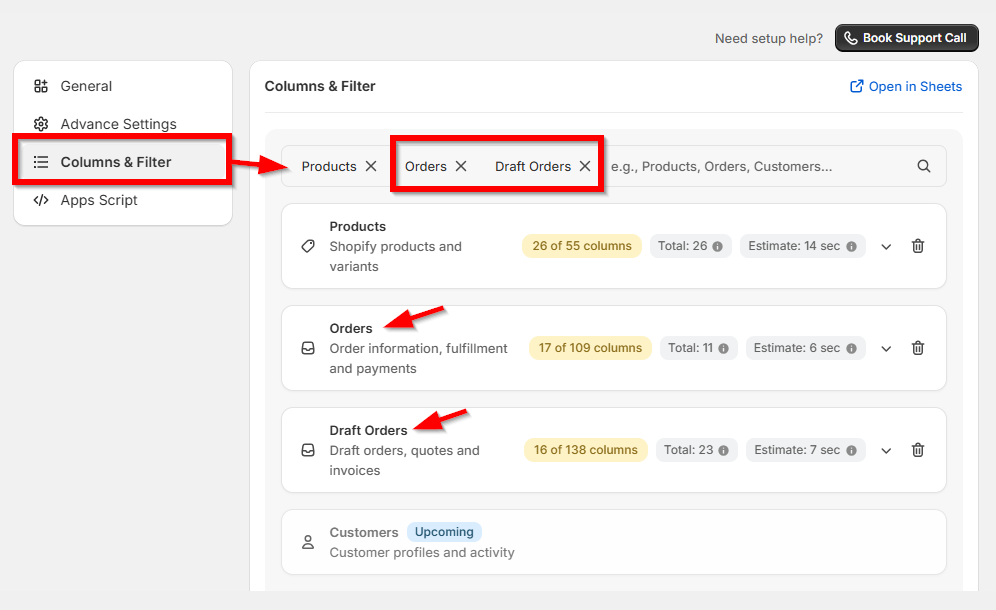
FlexSync → Columns & Filter
Here, you can select the data you want to export to your Google Sheet.
You can add:
- Orders – Shopify order information, fulfilment, and payment data.
- Draft Orders – Draft orders, quotes, and invoices.
Click the dropdown arrow beside Orders or Draft Orders to expand the section and select the columns you need.
3. Select the Required Columns
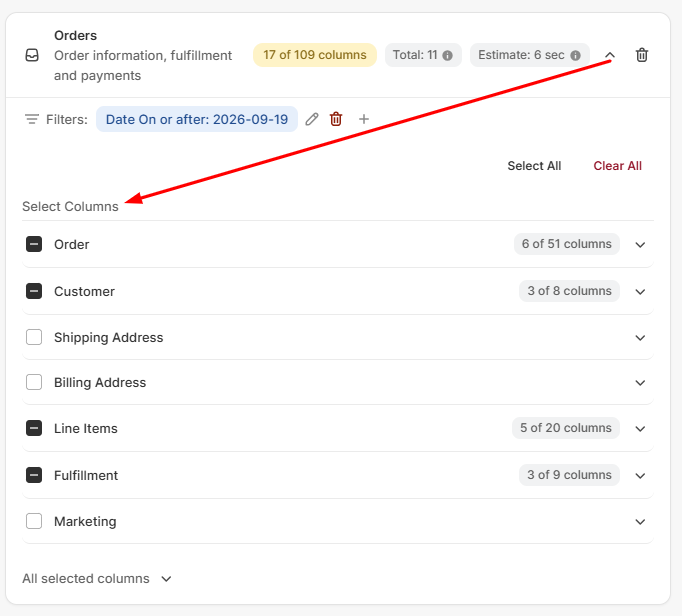
After adding Orders or Draft Orders, expand the corresponding section to see the available fields.
Select only the columns you need for your workflow.
For example, the Orders section can contain information related to:
- Order details
- Customer information
- Fulfillment
- Payment
- Other supported order data
Similarly, Draft Orders can contain information related to:
- Draft order details
- Quotes
- Invoices
- Customer/order information
- Other supported draft-order data
4. Apply Filters When Needed #
FlexSync allows you to configure filters so you can control which data is included in your Google Sheet.
You can use filters to create a more focused spreadsheet instead of exporting unnecessary data.
For example, you may configure your Orders export to include only the orders that are relevant to your workflow.
Important: If you change a filter or modify your column configuration, you need to run Export & Continue again to apply the new configuration.
5. Export the Data to Google Sheets #
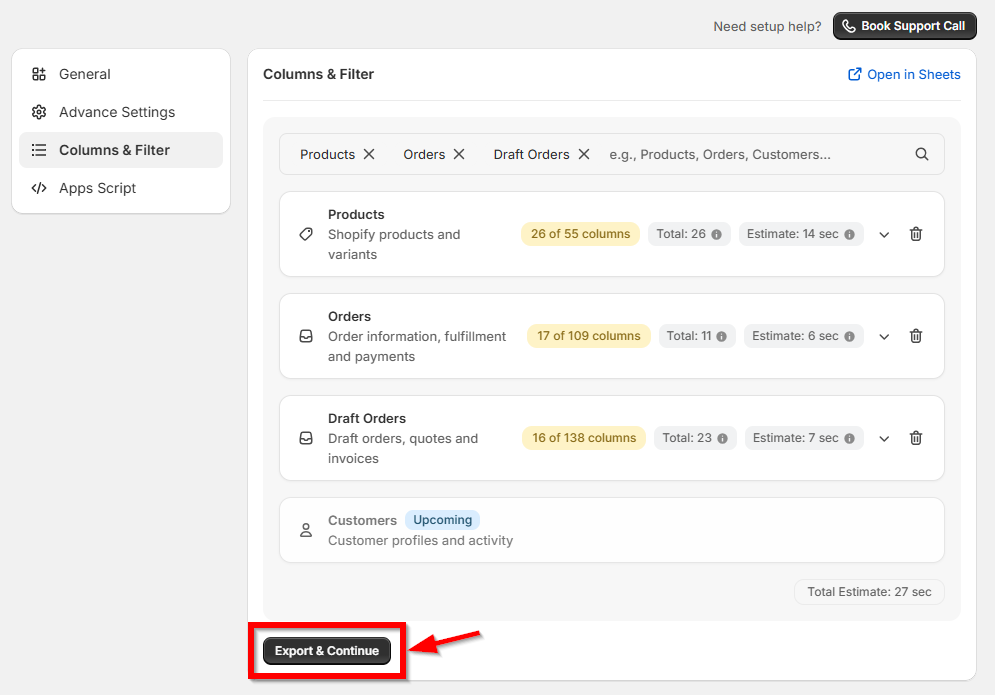
Once your Orders and Draft Orders configuration is ready, click:
Export & Continue
FlexSync will export the selected data and create the corresponding tabs in your connected Google Sheet.
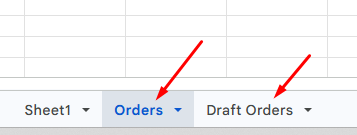
Your spreadsheet can contain separate tabs such as:
- Orders
- Draft Orders
- Products
- Other configured data
6. Orders/Draft Orders Tab in Google Sheets #
After the export is complete, open your Google Sheet and go to the new tabs.
The tab contains the order data selected from your FlexSync configuration.
You can use the spreadsheet to review your Shopify orders and, where supported, update specific fields directly from Google Sheets.
Editable vs. Non-Editable Fields #
Keep in mind that not all fields in the Orders tab are editable. Editable columns are in Yellow color.
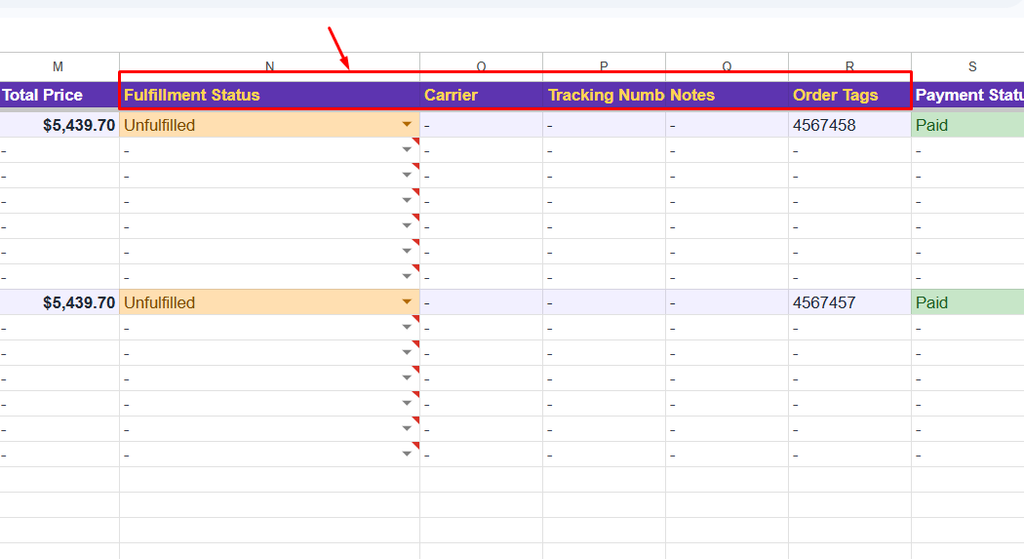
Only fields supported by FlexSync for bidirectional syncing should be changed.
If a field is not supported for updates, changing its value in Google Sheets will not necessarily update Shopify.
7. Update Orders from Google Sheets #
For supported editable fields, you can make changes directly in the Orders tab.
The workflow is:
Edit the supported field → Save the Google Sheet → Push order changes to Shopify
After making your changes:
- Open the Orders tab.
- Update the supported field.
- Save your changes in Google Sheets.
- Return to FlexSync.
- Click Push order changes to Shopify.
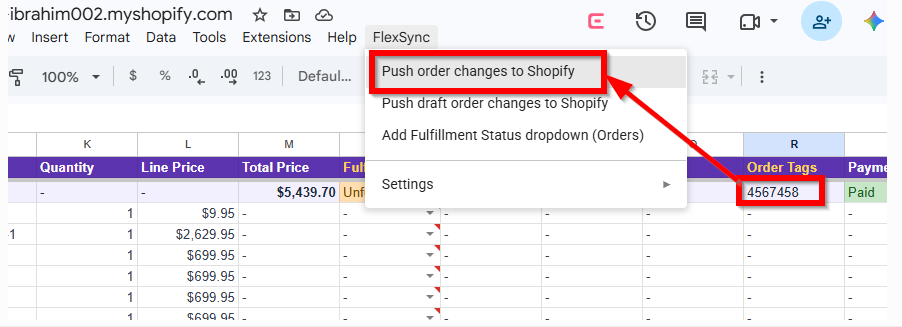
Note: Simply changing a value in Google Sheets does not mean that the change has already been applied to Shopify. You need to use Push order changes to Shopify.
8. Manage Fulfilment Status from Google Sheets #
FlexSync can also provide a Fulfilment Status dropdown for Orders.
This makes it easier to manage supported fulfilment-related changes directly from your spreadsheet.
You can select the required status from the dropdown instead of manually entering the value.
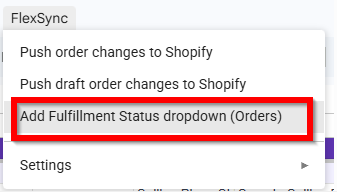
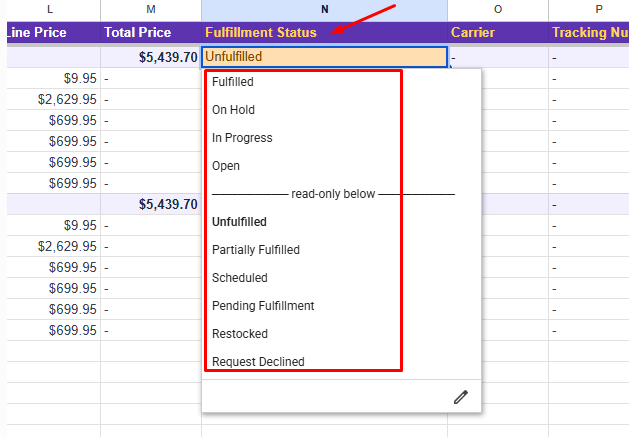
Select the appropriate fulfilment status from the available dropdown options.
After changing the fulfilment status:
Save the sheet → FlexSync → Push order changes to Shopify
The supported fulfilment change will then be synced to Shopify.
9. Update Draft Orders from Google Sheets #
To update a supported Draft Order field:
- Open the Draft Orders tab.
- Edit the supported field.
- Save the changes in Google Sheets.
- Return to FlexSync.
- Click Push draft order changes to Shopify.
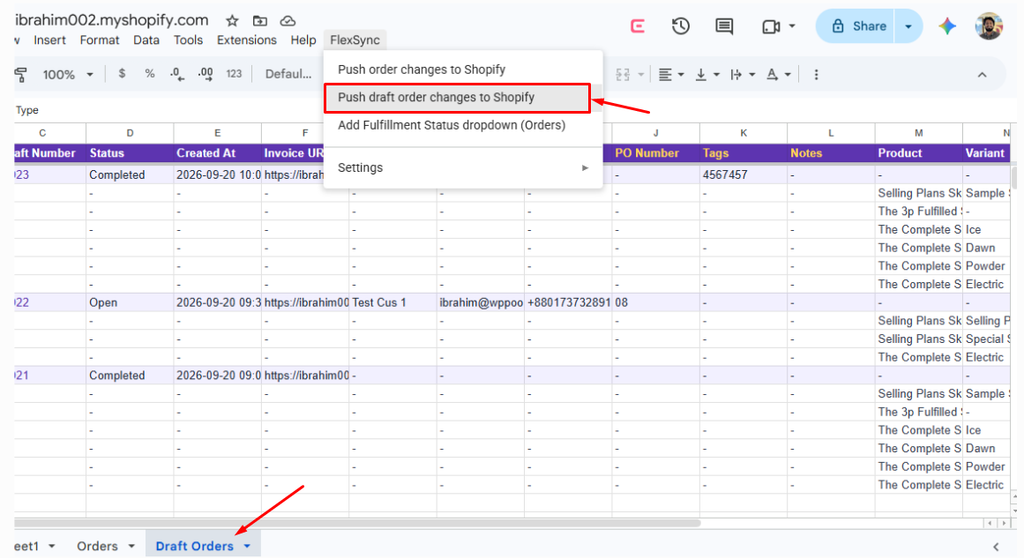
The workflow is:
Edit Draft Order → Save → Push draft order changes to Shopify → Shopify
Important: Only supported editable fields can be pushed back to Shopify.
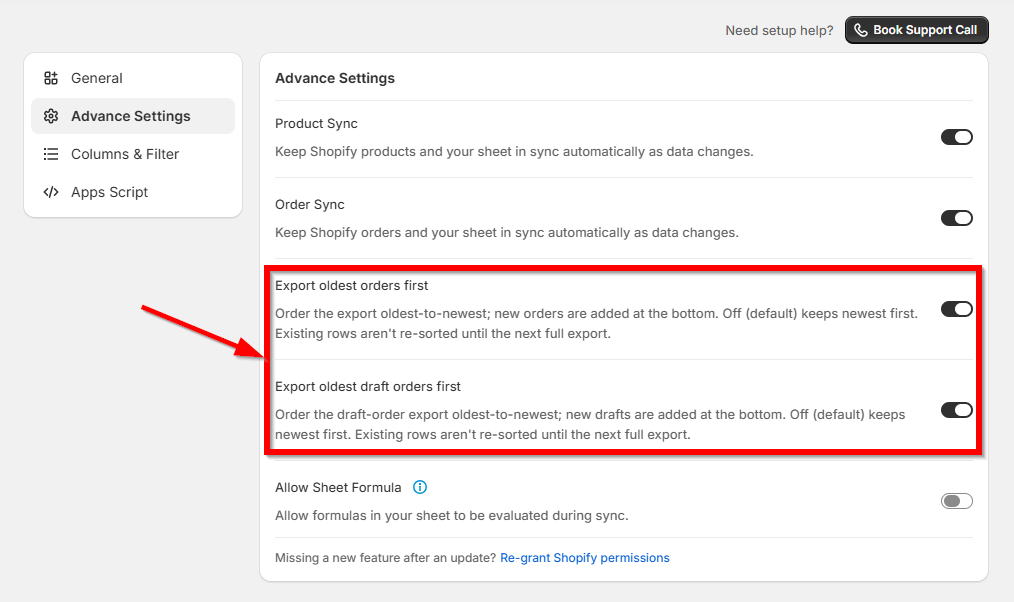
10. Export Older/Older Draft Orders First #
FlexSync provides an Export oldest orders/Draft Orders first option under Advance Settings.
When enabled, FlexSync exports orders from oldest to newest, with newly added orders appearing at the bottom.
When disabled, FlexSync uses the default ordering, which keeps newer orders first.
Existing rows are not automatically re-sorted until the next full export.
11. When Do You Need to Export Again? #
You should use Export & Continue whenever you change the FlexSync configuration.
For example, run Export & Continue again after:
- Adding or removing columns
- Changing Order or Draft Order settings
- Changing filters
- Changing the selected data configuration
- Changing relevant export settings
This ensures that your updated configuration is applied to the Google Sheet.
Remember: Configuration changes in FlexSync and data changes in Google Sheets are two different workflows.
12. Two-Way Workflow at a Glance #
Shopify → Google Sheets #
Shopify Orders / Draft Orders
↓
FlexSync
↓
Export & Continue
↓
Google Sheets
FlexSync exports the configured Shopify data to the appropriate spreadsheet tab.
Google Sheets → Shopify #
Edit a supported field
↓
Save the Google Sheet
↓
Open FlexSync
↓
Push order changes to Shopify
or
Push draft order changes to Shopify
↓
Shopify is updated
This follows FlexSync’s bidirectional-sync approach, where supported fields can be exported from Shopify, edited in Google Sheets, and synchronized back to Shopify.
Important Notes #
- Only supported fields are editable. Some fields in the Orders and Draft Orders tabs are read-only and cannot be used to update Shopify.
- Save your Google Sheet before pushing changes. Make sure your changes have been saved before using the Push option in FlexSync.
- Changing the spreadsheet does not automatically mean Shopify is updated. Use the appropriate Push action in FlexSync to send supported changes back to Shopify.
- Run Export & Continue after configuration changes. If you change columns, filters, or relevant settings in FlexSync, complete the export again.


