Need your order data in a spreadsheet for bookkeeping, sales tax, fulfillment, or a sales report? You can export Shopify orders to Excel with the built-in CSV export. It is free, and no app is needed.
This guide shows how to export Shopify orders to Excel step by step, how to open the file without scrambled characters, and how to filter orders by state, ZIP code, or date once they are in Excel.
It also covers where the CSV method falls short, and how FlexSync lets you manage orders, pre-orders, and draft orders from Google Sheets instead.
Table of Contents
How to Export Shopify Orders to Excel
Shopify exports orders as a CSV file, which Excel opens. Here is how to export Shopify orders to Excel from your admin:
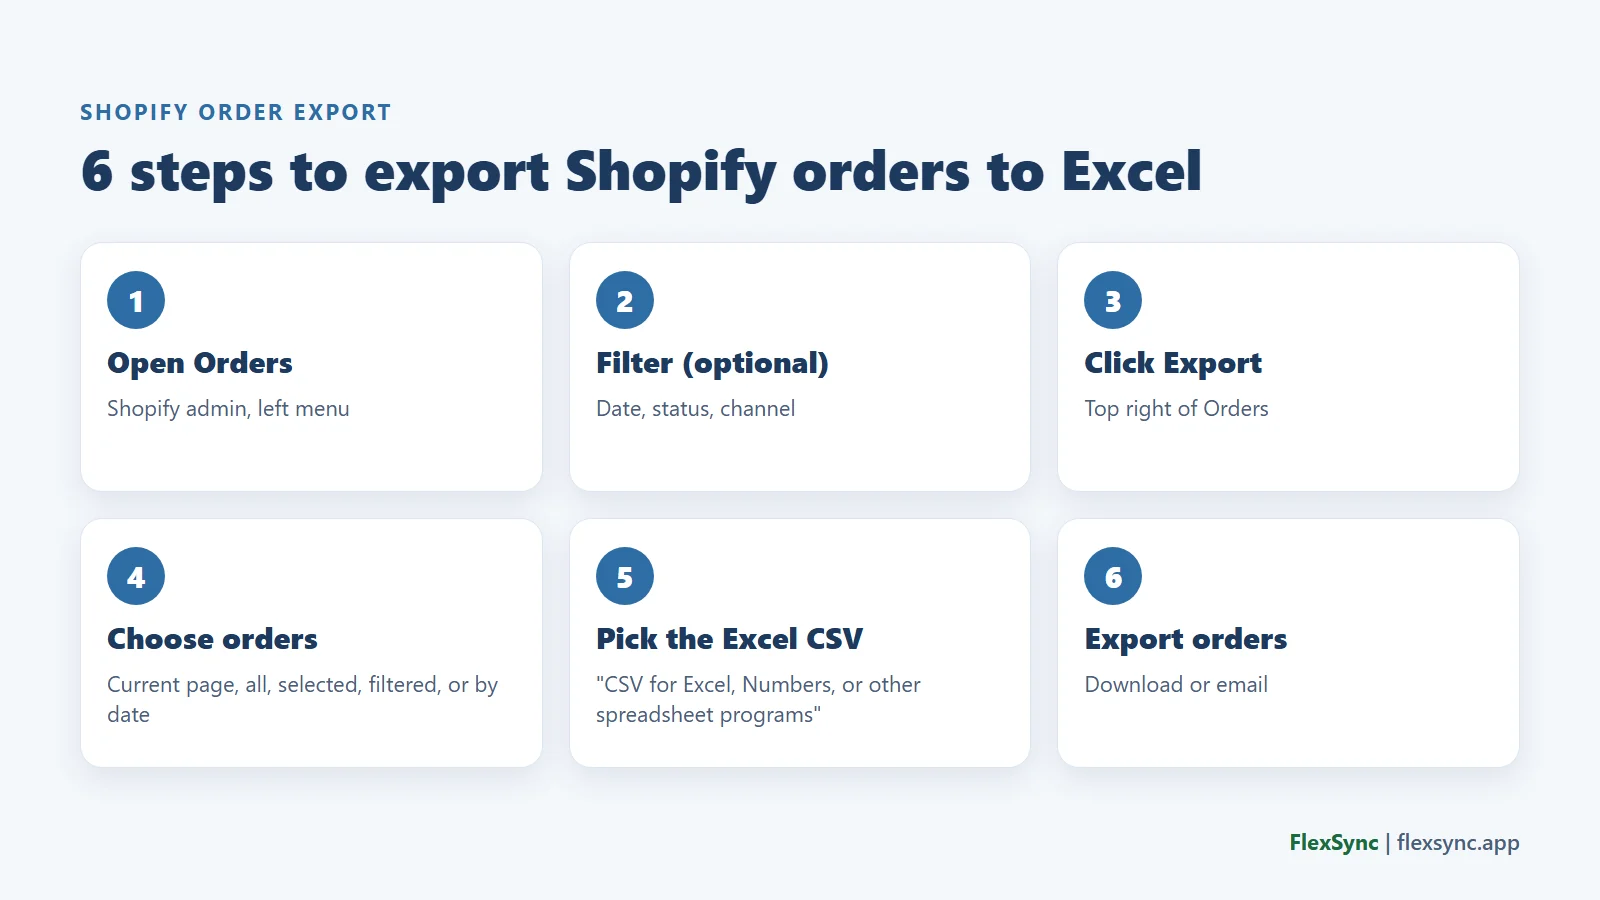
- Open Orders. Log in to your Shopify admin and click Orders in the left menu.
- Filter your orders (optional). Use the date filter, a preset like “Last 30 days”, or filters for status, channel, or payment method. To export specific orders, tick them in the list.
- Click Export. The button is at the top right of the Orders page.
- Choose which orders to export. Pick Current page, All orders, Selected orders, the orders matching your search or filter, or Orders by date with a start and end date.
- Pick the Excel format. Under Export as, choose “CSV for Excel, Numbers, or other spreadsheet programs.” This version opens more cleanly in Excel than the plain CSV.
- Export. Click Export orders for full order details, or Export transaction histories for payment data only.
WHERE THE FILE GOES
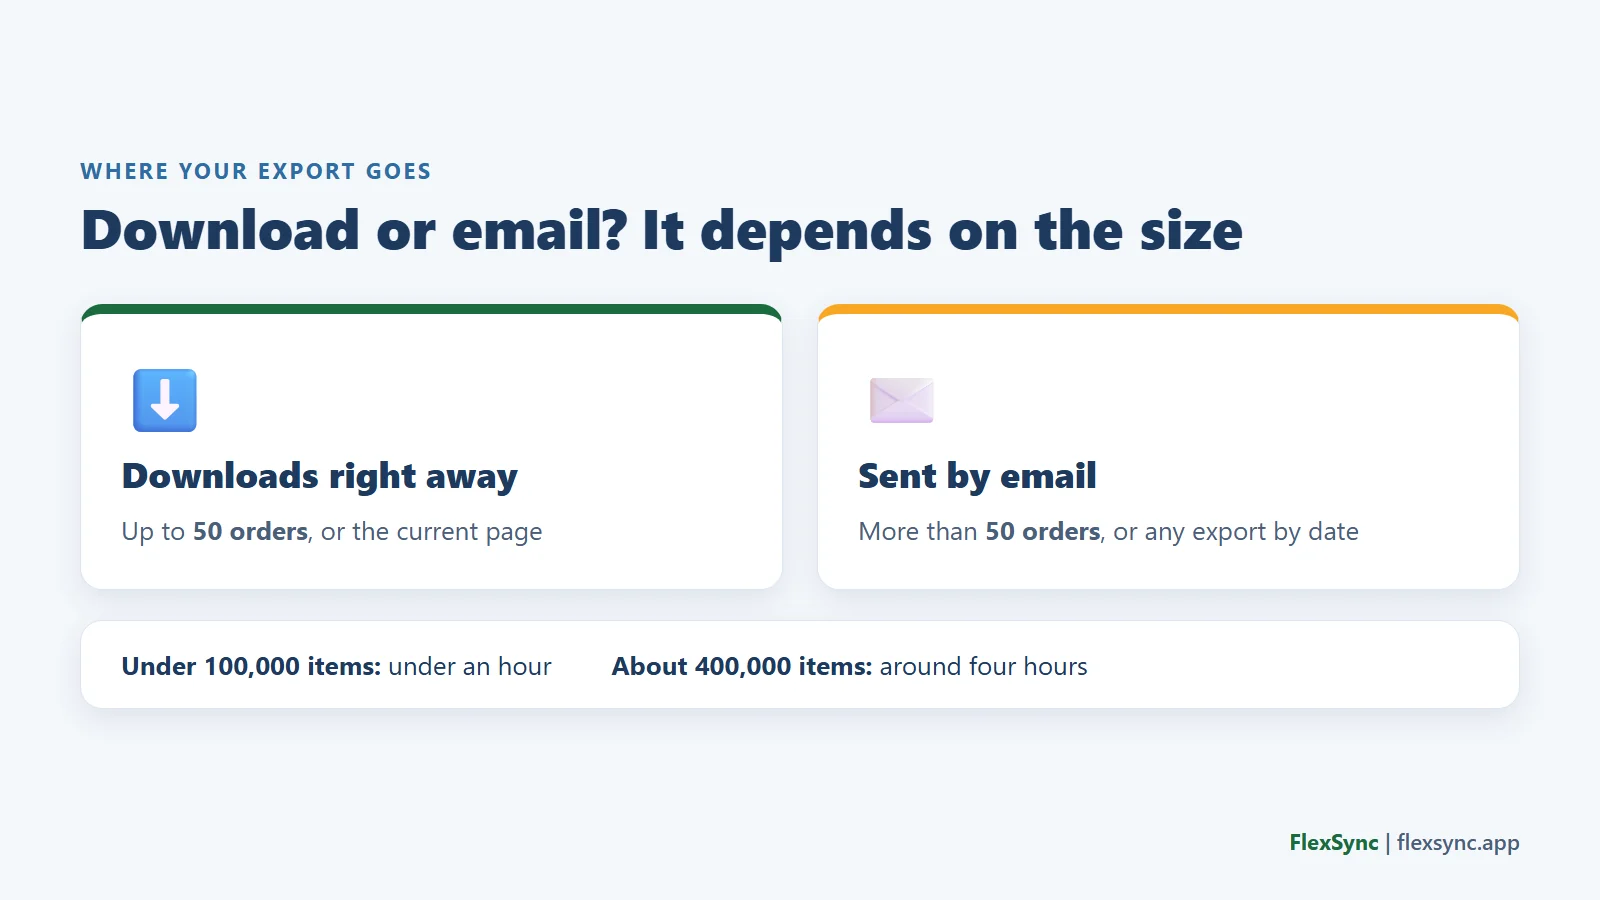
Exports of up to 50 orders, or the current page, download right away. Exports of more than 50 orders, or exports by date, are emailed to you and the store owner.
Exports under 100,000 items can finish in under an hour. Around 400,000 items can take about four hours. For very large stores, export in smaller date batches.
Date range tip: Shopify uses your store time zone. To export January 1 to March 31, set the start to 12:00 AM on January 1 and the end to 11:59 PM on March 31.
Transaction histories: This file covers captured payments only. Authorization data is not included.
Shopify covers every option you have when you export Shopify orders to Excel in its guide to exporting orders.
How to Open the Shopify Orders CSV in Excel
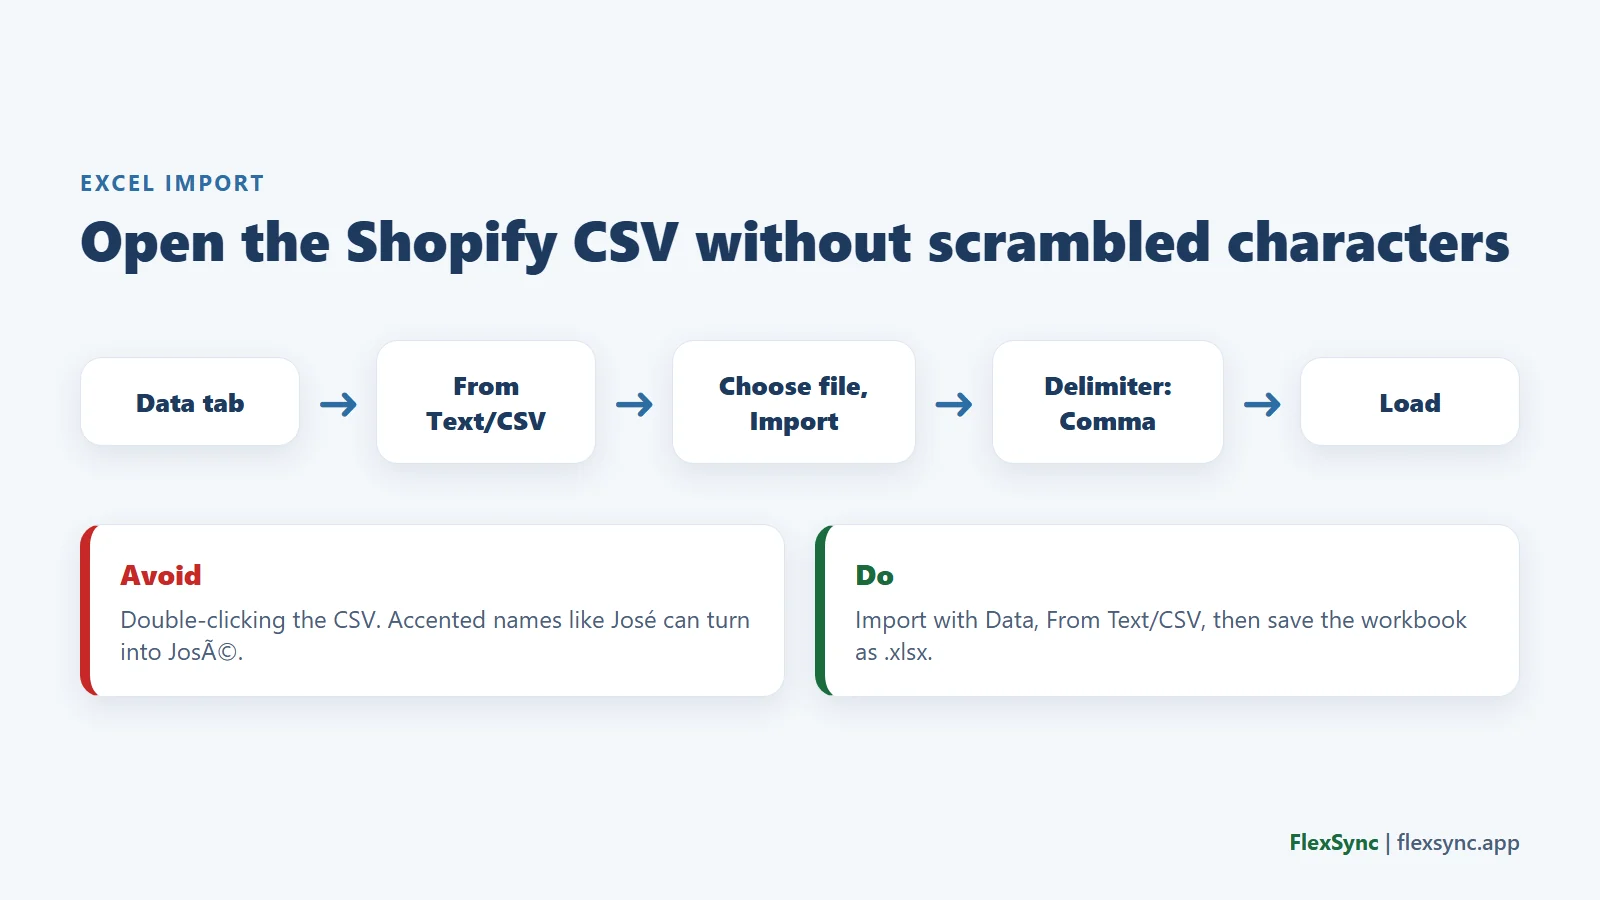
When you export Shopify orders to Excel, double-clicking the CSV can scramble special characters, such as accented customer names. Importing the file avoids this:
- Open a blank workbook in Excel.
- Go to the Data tab and select From Text/CSV.
- Choose your Shopify orders file and click Import.
- Check that the preview splits the columns correctly. The delimiter should be Comma.
- Click Load. Use Transform Data instead if you want to change column types first.
Microsoft explains each option in its guide to importing text and CSV files. Once the data is loaded, save the workbook as an .xlsx file.
Prefer Google Sheets? Go to File, Import, Upload, and pick the CSV. Set Import location to “Insert new sheet(s)” and leave the separator on “Detect automatically.”
What the Shopify Order Export Includes
Here is what you get when you export Shopify orders to Excel. Key columns include:
| Column Group | Examples |
|---|---|
| Order details | Name (the order number), Created at, Tags, Risk Level |
| Source | Where the order came from, such as web, POS, or draft order |
| Customer | |
| Status | Financial Status, Fulfillment Status |
| Money | Discount Code, Shipping, Taxes, Total |
| Line items | Lineitem name, Lineitem SKU, Lineitem quantity, Lineitem price |
| Addresses | Billing and shipping fields, including Shipping Province and Shipping Zip |
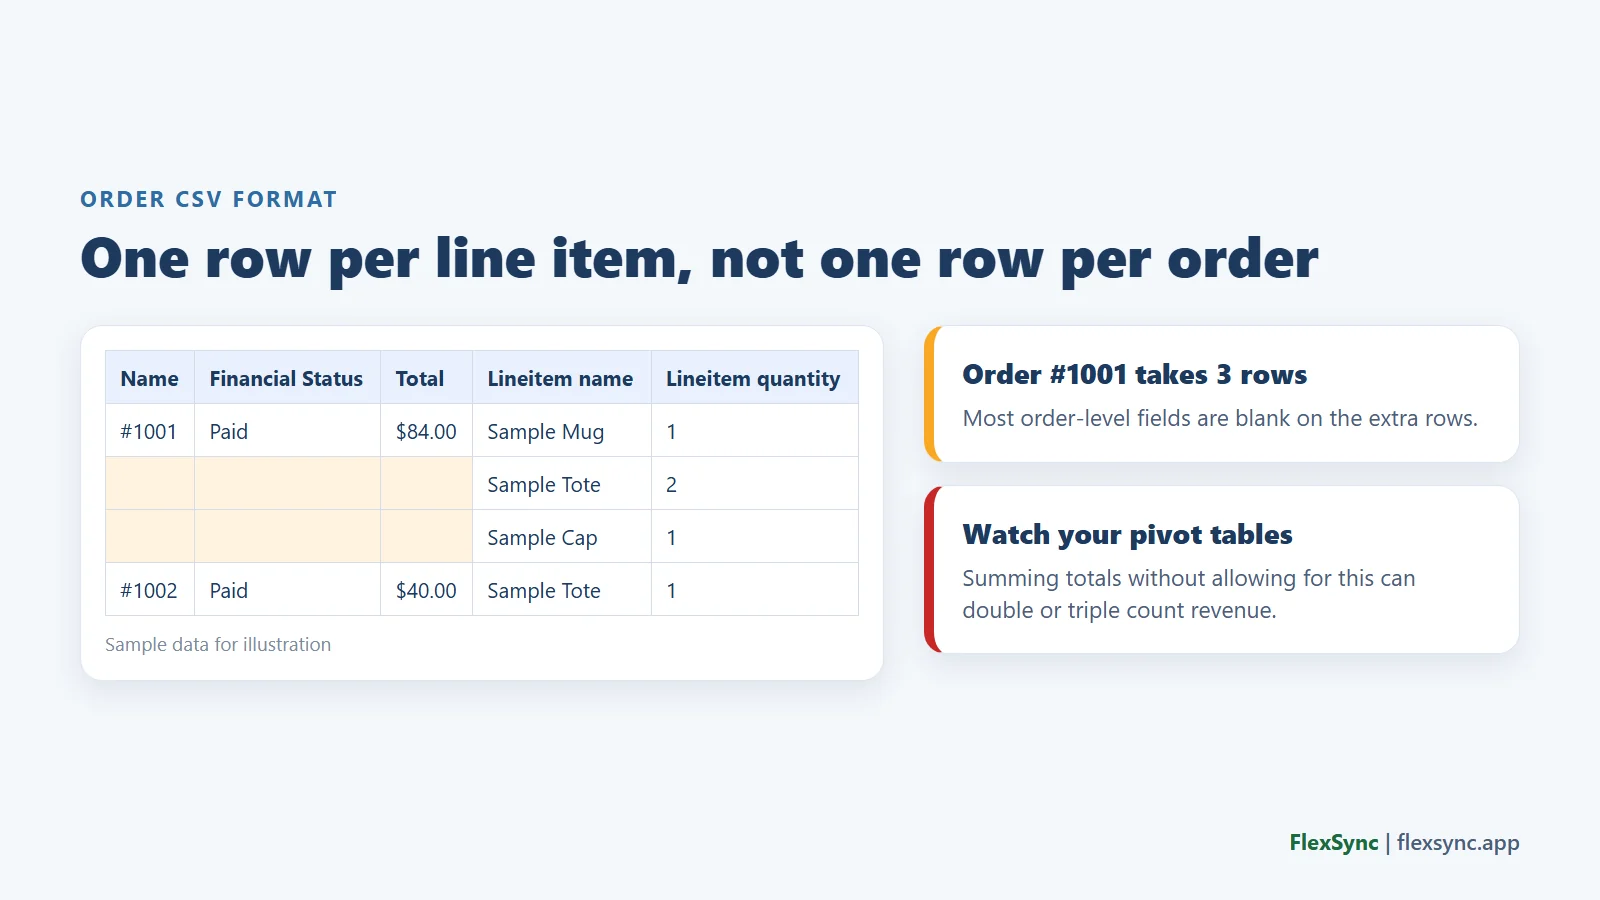
One row per line item. An order with three products takes three rows, and most order-level fields are blank on the extra rows. If you sum order totals in a pivot table without allowing for this, you can double or triple count revenue.
How to Filter Exported Shopify Orders by State, ZIP, or Date
After you export Shopify orders to Excel, you can slice them by location. Shopify does not let you filter orders by state before you export. The fix is to export by date, then filter in Excel. This helps with sales tax reports, regional sales, and shipping planning.
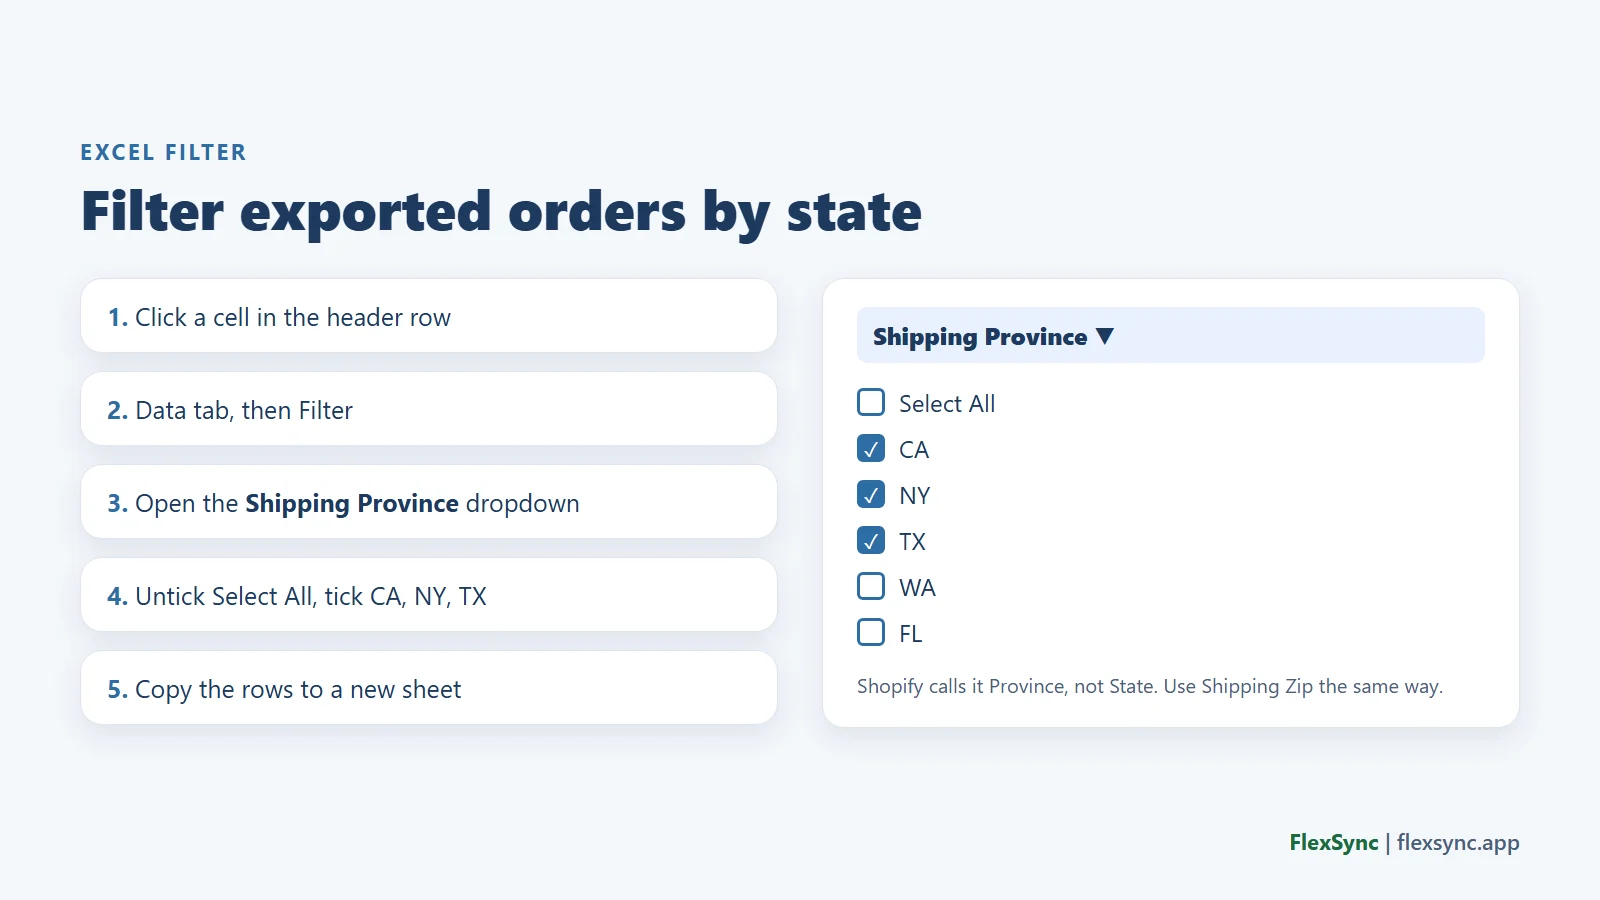
- Click any cell in the header row.
- Go to the Data tab and click Filter.
- Open the dropdown on the Shipping Province column. Shopify calls it Province, not State.
- Untick Select All, then tick the states you need, using two-letter codes like CA, NY, or TX.
- Copy the filtered rows to a new sheet, or save them as a new file.
- ZIP codes: Filter the Shipping Zip column the same way.
- Tax vs customer location: Use Shipping Province for sales tax, and Billing Province to see where customers are based.
- Duplicates: Use Data, Remove Duplicates on the order number column.
- Blank states: Check your checkout settings so the address is a required field.
The same filters work in Google Sheets with Data, Create a filter. Once your orders live in Sheets, you can also use Google Sheets formulas for Shopify to total sales by state automatically.
Limits of Exporting Shopify Orders to CSV
Choosing to export Shopify orders to Excel works well for a one-time report. It gets harder when you need order data every week:
- No scheduling. Native exports are manual, one-time actions. Shopify has no built-in option to repeat them.
- Fixed columns. You get the default columns Shopify chooses, with no formatting and one record type per file.
- Separate files. The customer export has no itemized order history, so linking customers to orders means matching two files by email.
- Edits stay in Excel. Changing a fulfillment status in your spreadsheet does not update Shopify.
- No purchase order export. Shopify does not offer CSV or Excel export for purchase orders. For stock levels, use Products, Inventory, Export instead.
- Sensitive data. Order files hold customer names, emails, and addresses, so limit who can open them.
If you export Shopify orders to Excel every week, a live connection to a spreadsheet saves those repeat steps. You can compare other options in our list of order management apps for Shopify.
A Better Way: Manage Shopify Orders in Google Sheets With FlexSync
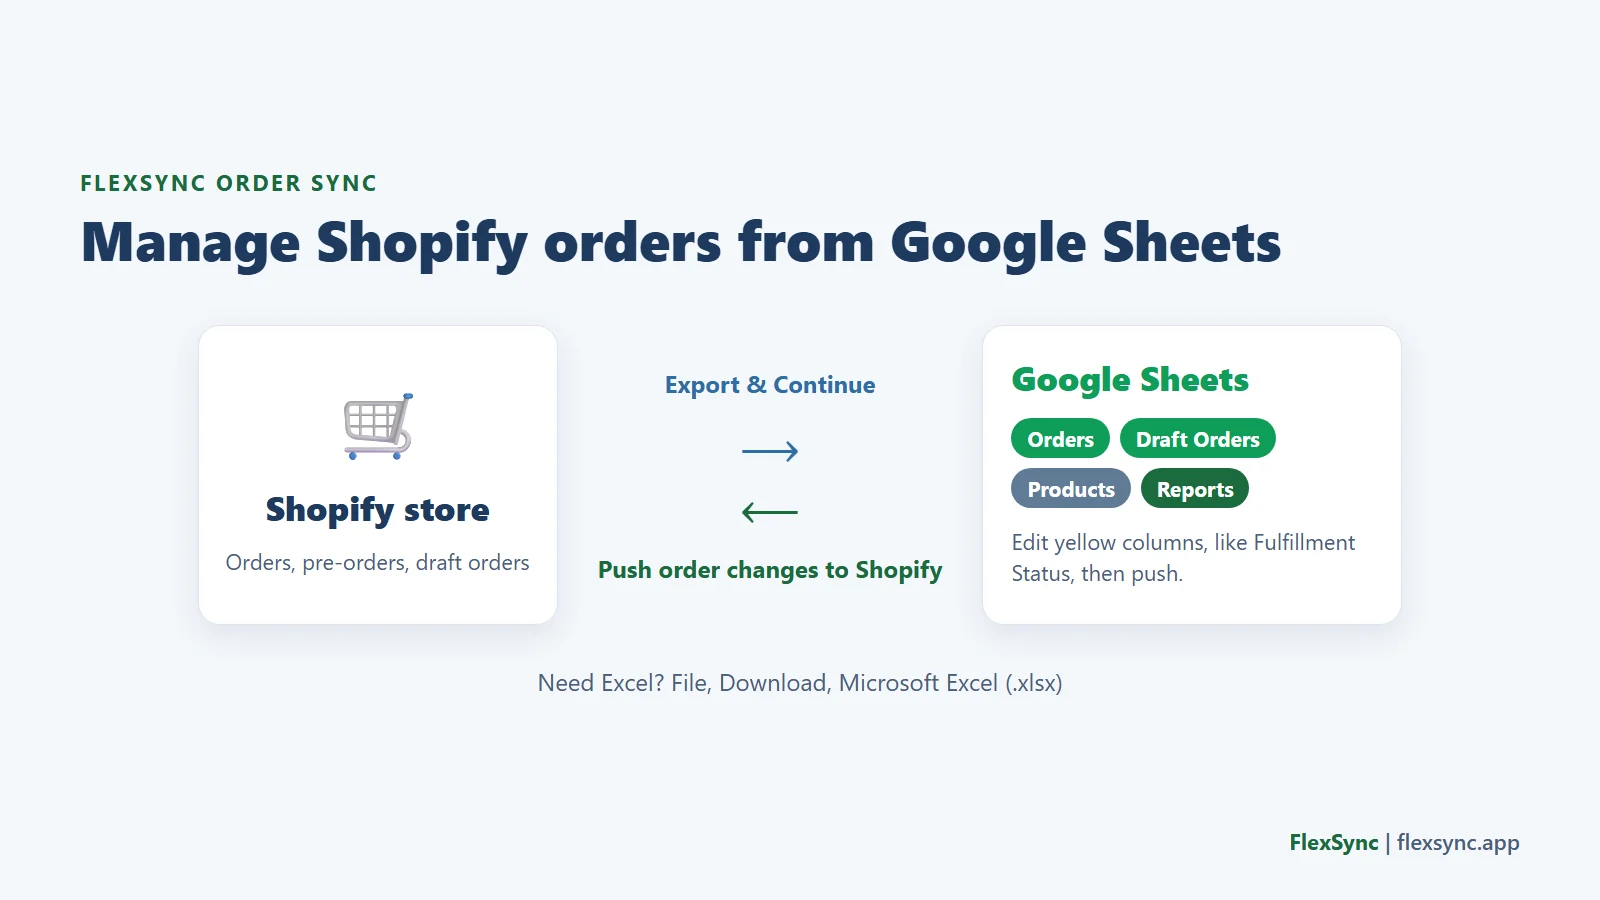
FlexSync connects your Shopify store to Google Sheets. Instead of having to export Shopify orders to Excel each time, your orders, pre-orders, and draft orders live in a connected Sheet, next to your products and inventory.
You can also edit supported order fields in the Sheet and push the changes back to Shopify. That turns your spreadsheet from a report into a place where you actually manage orders.
How to Export Shopify Orders to Google Sheets With FlexSync
- Install FlexSync from the Shopify App Store and connect your Google account.
- Go to Advance Settings and turn on Order Sync.
- Open Columns & Filter, expand Orders or Draft Orders, and choose the columns you need.
- Click Export & Continue. Orders and draft orders land in their own tabs in your Sheet.
- Edit the yellow, editable columns, such as Fulfillment Status, then click Push order changes to Shopify.
The full setup is in the FlexSync order and draft order sync guide.
What You Can Do With Orders in Google Sheets
- Orders and draft orders: Each gets its own tab, and draft orders cover quotes and invoices.
- Pre-orders: Pre-orders placed in your store sync to the Sheet with your other orders, so you can see what has been ordered ahead of stock and update it when it ships. Still choosing a pre-order tool? See the best Shopify pre-order apps.
- Bulk order updates: Change fulfillment status for many orders with the built-in dropdown, then push the changes in one click.
- Filters: Export only the orders you need, such as unfulfilled orders or a date range.
- Oldest-first export: Sort exports oldest first to match a pick-and-pack workflow.
- One workspace: Products, inventory, metafields, and orders all sit in the same Sheet.
- Analytics and Reports (new): Create analytics and reports for your Shopify store and keep them in a separate tab inside your connected Sheet. Here is how to read Shopify sales reports.
- Team access: Share the Sheet with your team without adding Shopify staff accounts.
STILL NEED AN EXCEL FILE?
In Google Sheets, click File, Download, Microsoft Excel (.xlsx). You get a clean Excel copy of your current order data without running a new Shopify export.
For a deeper walkthrough, read how to sync Shopify orders with Google Sheets or see more ways to manage Shopify orders.
Shopify CSV Export vs FlexSync
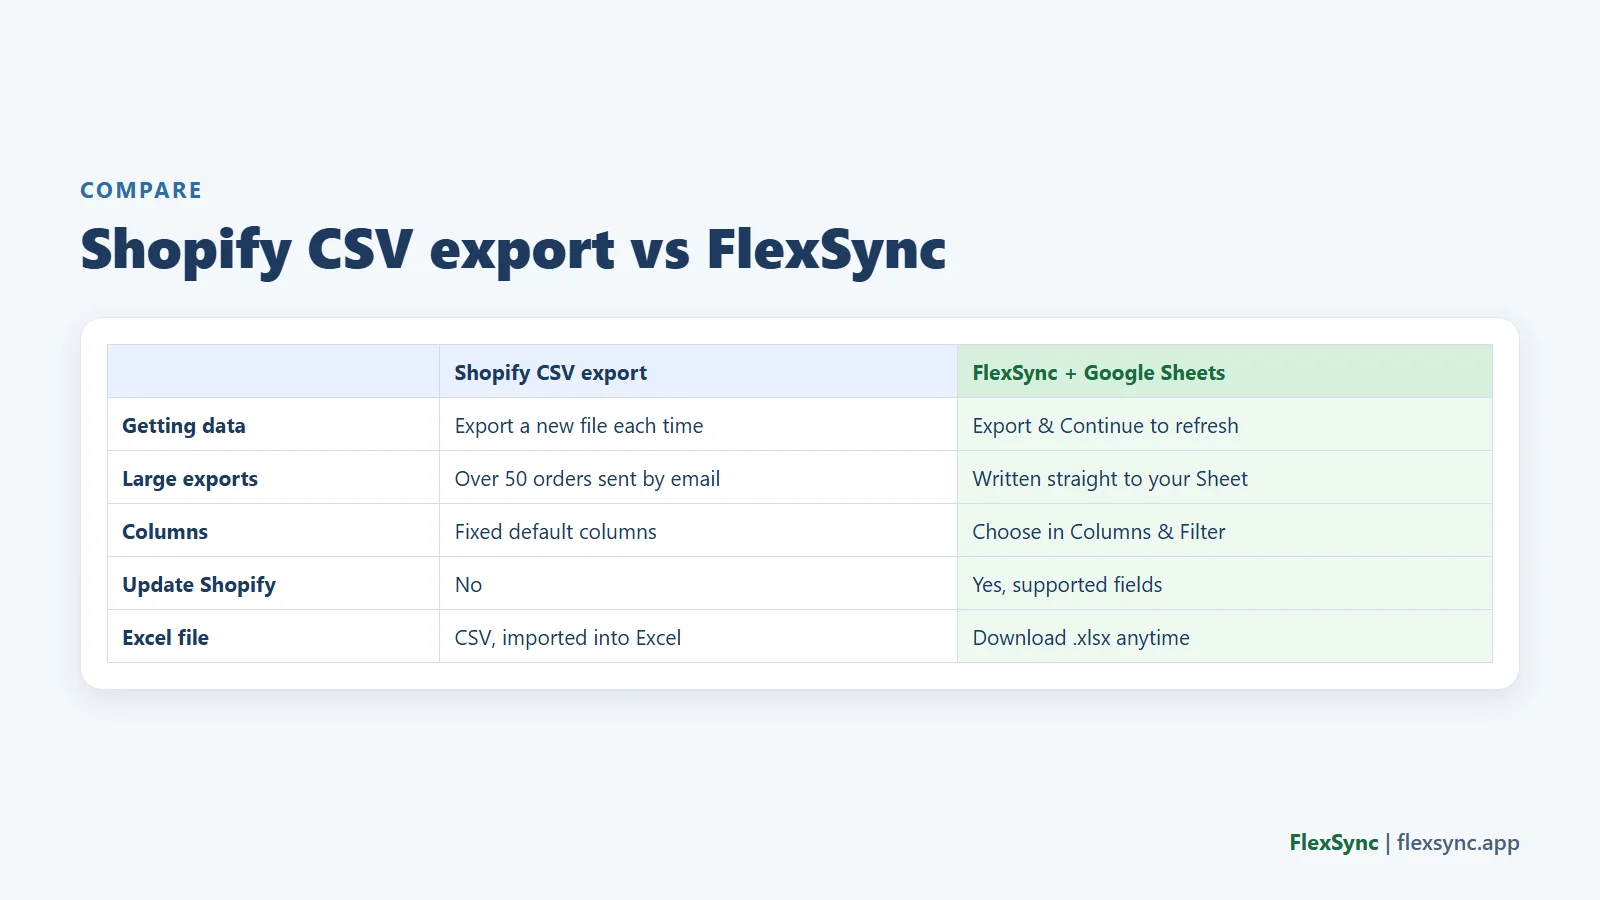
| Shopify CSV Export | FlexSync + Google Sheets | |
|---|---|---|
| Cost | Free, built in | Free plan, paid plans from $9/month |
| Getting data | Export a new file each time | Export & Continue to refresh your Sheet |
| Large exports | Over 50 orders sent by email | Written straight to your Sheet |
| Columns | Fixed default columns | Choose columns in Columns & Filter |
| Edit and update Shopify | No | Yes, for supported fields |
| Products and inventory | Separate exports | Same Sheet |
| Excel file | CSV, imported into Excel | Download as .xlsx anytime |
Order Rows by FlexSync Plan
| Plan | Price | Order + Draft Order Rows |
|---|---|---|
| Free | $0 | 20 rows, 7-day history |
| Starter | $9/month | 500 rows, full history |
| Growth | $29/month | 5,000 rows, full history |
| Ultimate | $49/month | Unlimited rows and history |
Paid plans include a 14-day free trial. See FlexSync pricing for current plans.
Frequently Asked Questions
Can I export Shopify orders directly to an .xlsx file?
No. When you export Shopify orders to Excel, Shopify gives you a CSV file, not a true .xlsx file. Open it in Excel with Data, From Text/CSV, then save it as .xlsx. With FlexSync, you can download your Google Sheet as .xlsx at any time.
Why did my Shopify order export arrive by email?
When you export Shopify orders to Excel in bulk, Shopify emails the file if you export more than 50 orders or export orders by date. Smaller exports download right away.
Why does one order take up several rows?
The order CSV uses one row per line item. An order with three products shows on three rows, with most order-level fields blank on the extra rows.
Can I schedule Shopify order exports?
Not natively. Each time you export Shopify orders to Excel, it is a manual, one-time action, so recurring exports need an app.
Can I export Shopify purchase orders to Excel?
Not at the moment. Shopify does not offer a CSV or Excel export for purchase orders. Products, Inventory, Export gives a CSV of on-hand, available, committed, and incoming stock per location.
Can I export Shopify draft orders?
Completed draft orders show up in the order export, with draft order in the Source column. FlexSync exports draft orders to their own tab in Google Sheets, where you can also push supported changes back to Shopify.
Can I manage Shopify pre-orders from Google Sheets?
Yes. When you export Shopify orders to Excel, pre-orders are just rows in a static file. With FlexSync, pre-orders sync to your Google Sheet along with your other orders. You can track them in one place and push supported changes, like fulfillment status, back to Shopify when stock arrives.
Conclusion
To export Shopify orders to Excel, click Export on the Orders page, choose the CSV for Excel format, and import the file with Data, From Text/CSV. It is free and works well for one-time reports and quick state or date filters.
If you work with orders every day, FlexSync gives you a live order Sheet instead. Manage orders, pre-orders, and draft orders, build reports in their own tab, and download an Excel copy whenever you need one.
